
As soon as the client confirms the estimate its status will be changed to Confirmed. At the same time the system will generate the next project step - the Workorder.
Changing Estimate Status manually
However, it's always possible to update the status manually from the Client’s profile or from the Estimate profile.
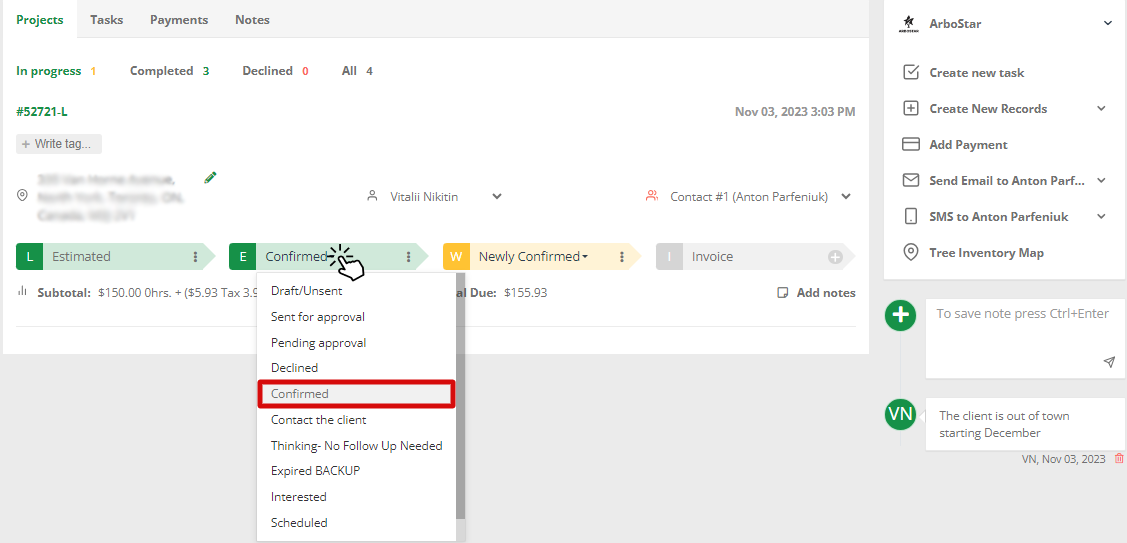
- To update the status from the client's profile please click on the estimate step. Available statuses will appear in the drop-down menu.
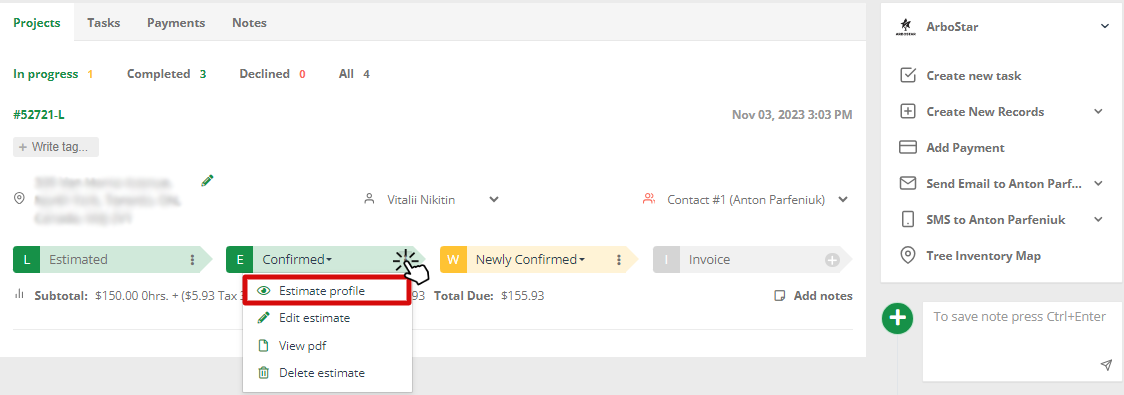
- To access Estimate profile and change the status from there please click on the Options icon and choose the corresponding option.
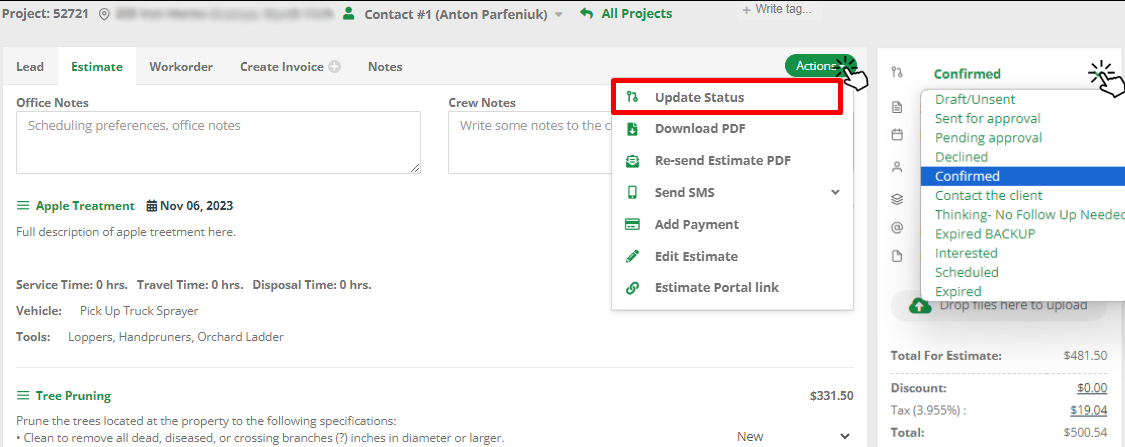
- On the Estimate profile please navigate to the Actions button or to the sidebar panel and change the status from there.
- On the next screen, you can add notes and payment details:
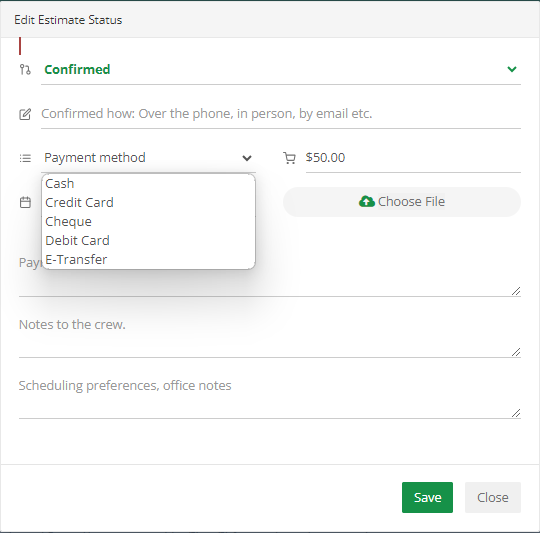
If the client has paid a deposit, you can add the amount of deposit as well as the way it was taken and later it will be deducted from the overall cost.
- Click Save once the form is filled. From now on, this estimate turns into a Workorder.
Changing estimate status to Declined
Before changing the estimate status and turning it into a workorder, you can easily decline a service on the estimate stage.
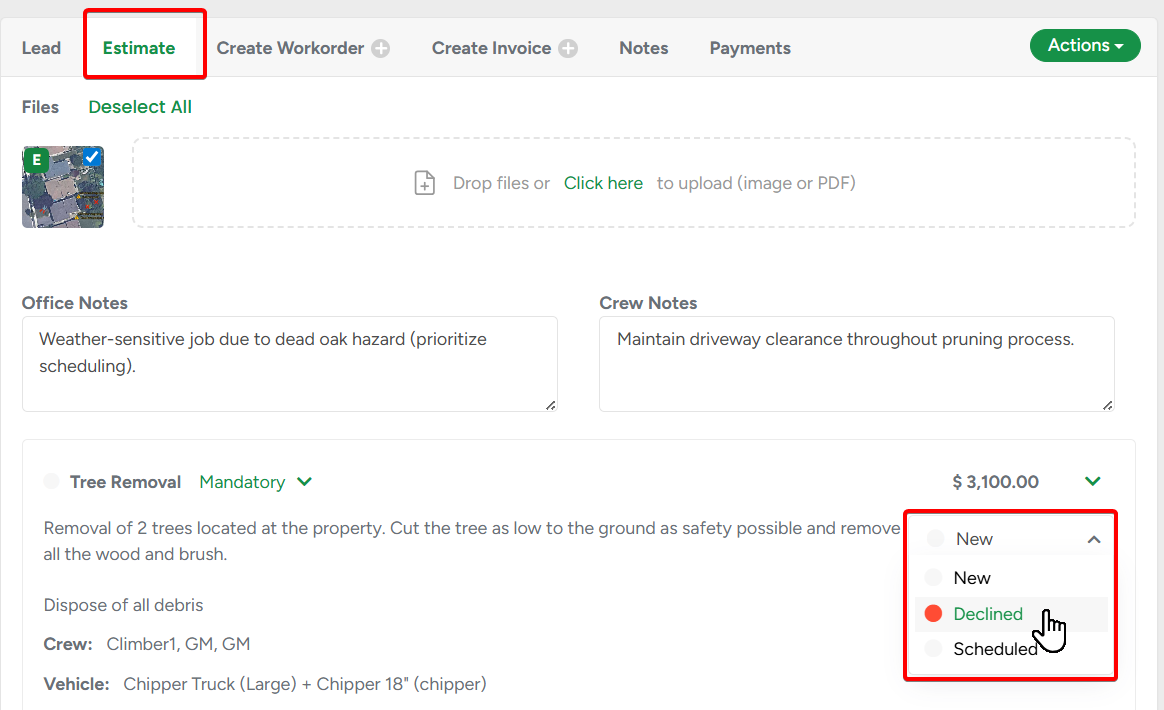
Please note, if the client didn't approve an optional service, its status will be changed to Declined automatically.
Comment from the customer portal
When confirming the estimate on the customer portal, clients can leave a comment that can later be seen in the workorder profile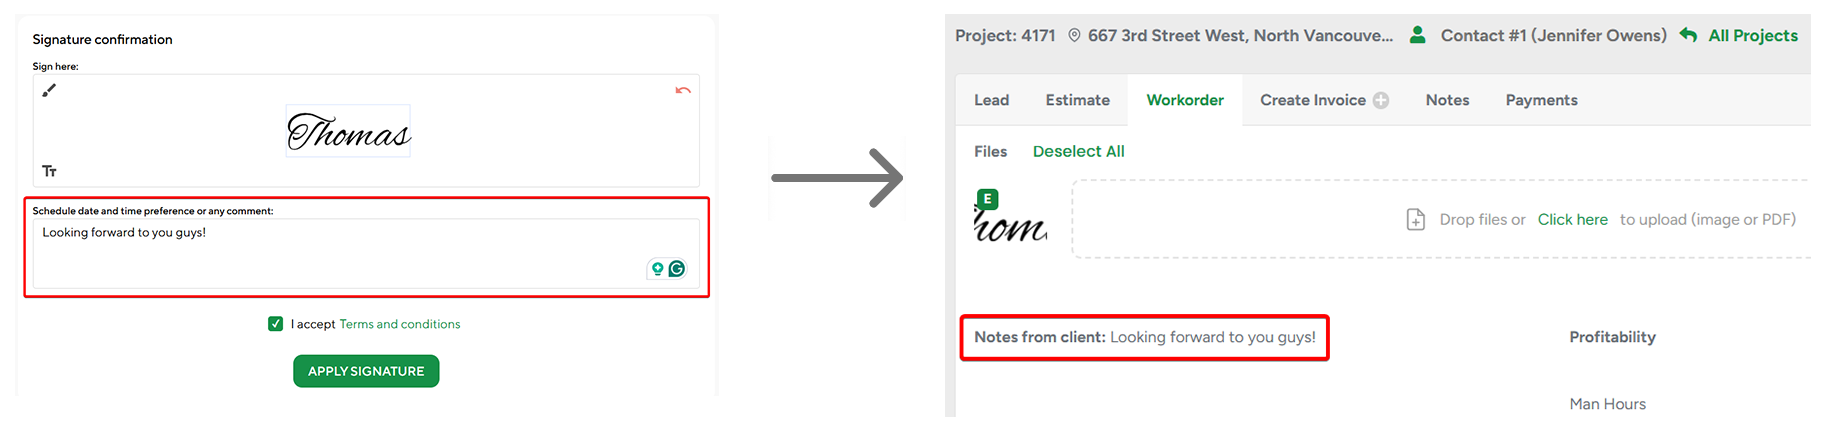
Workorder profile
You can access the Workorder page either from the client's profile, the same way we did with the estimate earlier, or from the Estimate profile by simply clicking on the Workorder tab once it's been generated.
At this stage, the Actions button has only three options:
- Download or view the WO PDF.
- Add full or partial payment.
- Edit the estimate that the WO is based on.

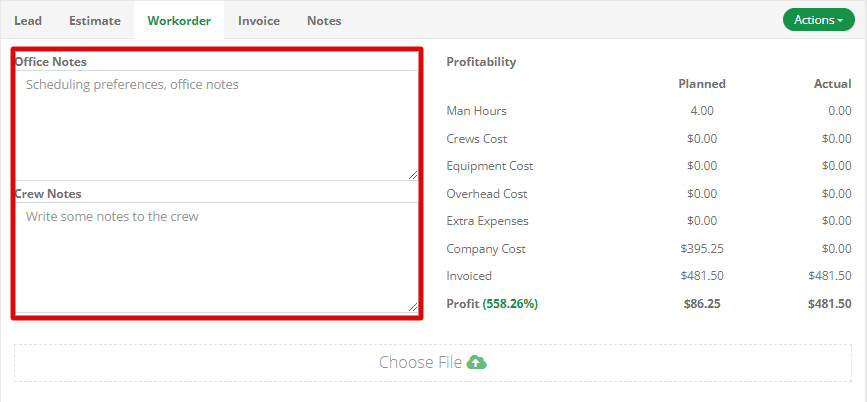
On the Workorder profile page, it's possible:
- To add notes that would appear on the Crew Schedule page, once you enter them.
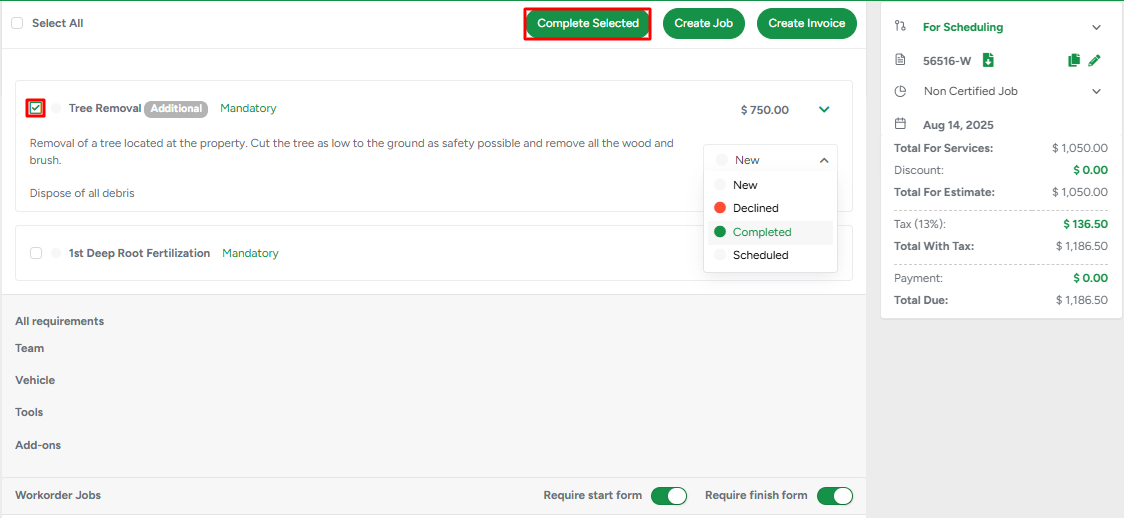
- To change the status of services manually, or select the required services and click on Complete Selected to change the statuses of all selected services to Completed. Once the service(s) is marked as completed, the Invoice for that service can be generated.
The Completed Date appears directly under the job status once a job is marked as Completed. This date is shown in green and can be clicked to open a calendar for adjustments, though only Admins can edit it, and it cannot be set earlier than the Workorder creation date.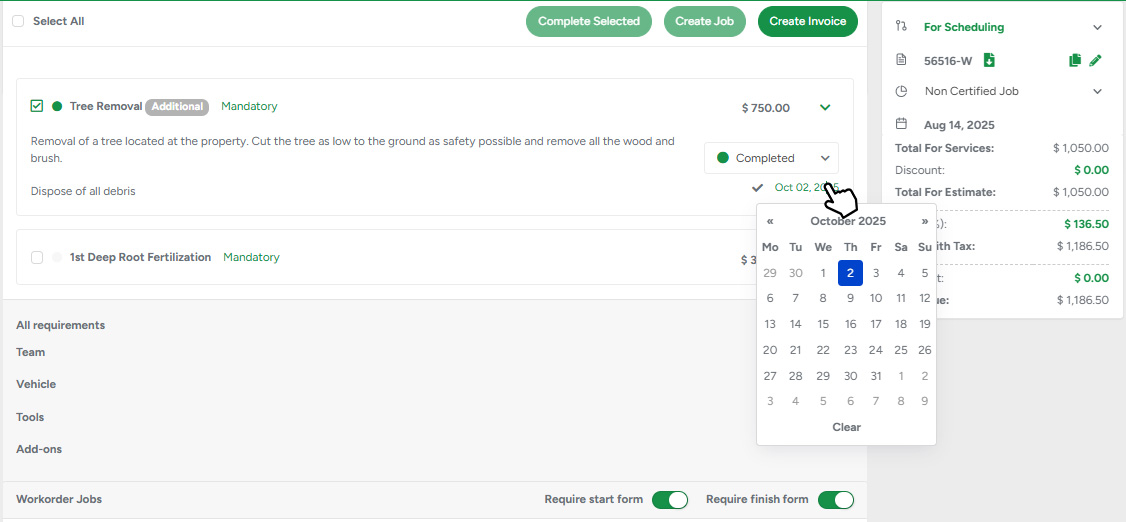
The Invoice Number displayed under the job status has also been updated to green, making it clear that it’s clickable.The system ensures that it cannot be set earlier than the project creation date. Finally, any changes to a service’s Completed Date will automatically update across all connected modules, including KPI Reports (Revenue) and Business Intelligence (Workorders → Add-Ons Report), ensuring consistent reporting and filtering.
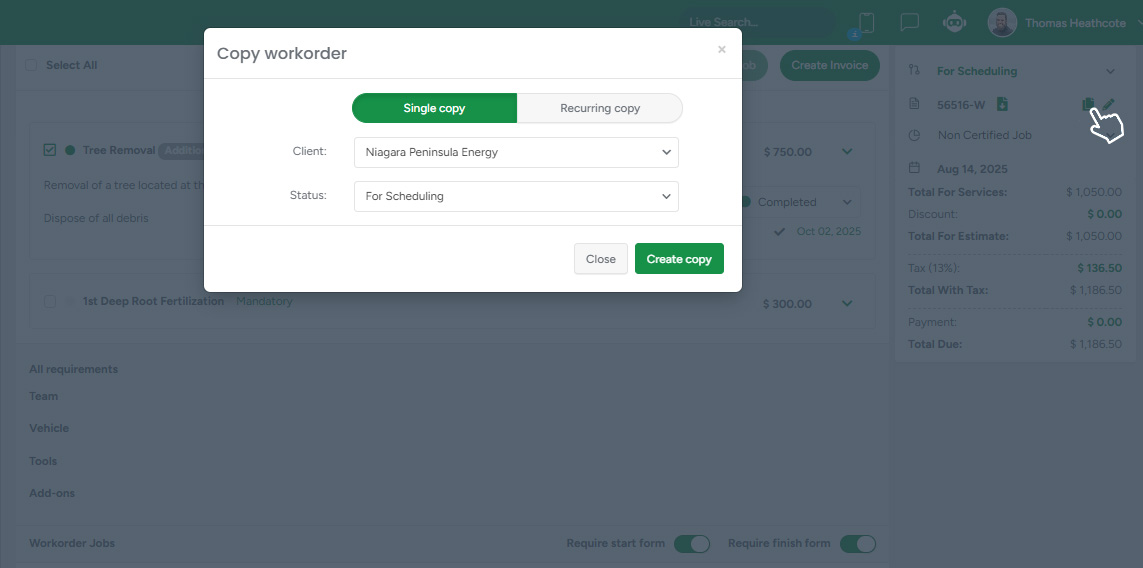
- To copy a workorder. Please navigate to the sidebar panel and click on the Files icon. The same feature is also applicable to Estimates.
Creating a job
There are two main ways to create a job for the workorder: using the crew schedule or by creating the job on the workorder page.
Choose the service line item to schedule (1) and then click on "Create job" (2)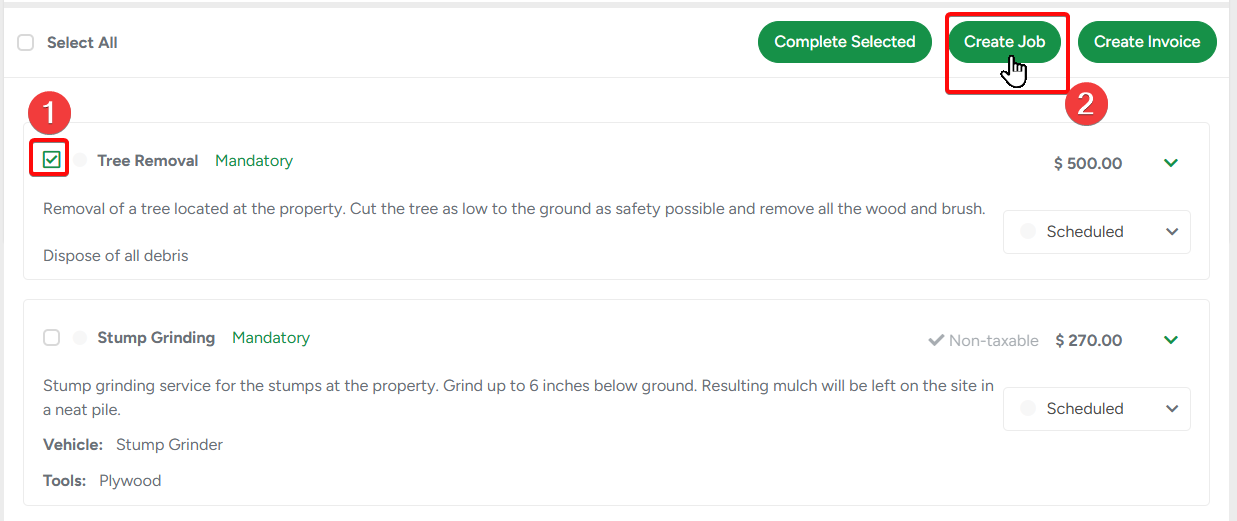
It will open a modal window where you can choose a date, whether it is a recurring* job or not, and click "Create job".
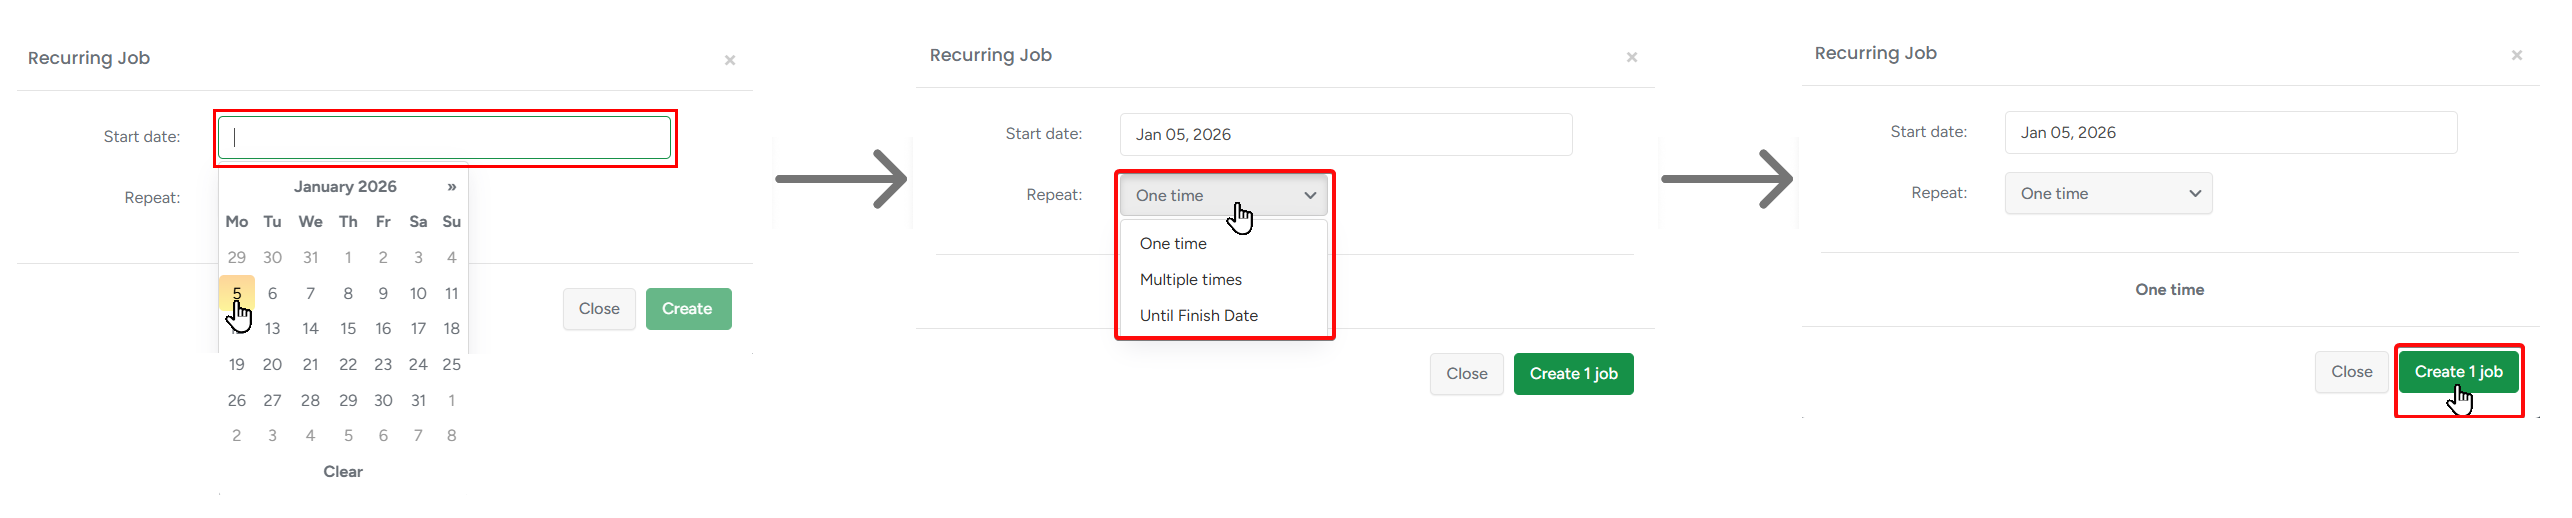
*recurring jobs have very similar settings to a recurring workorder: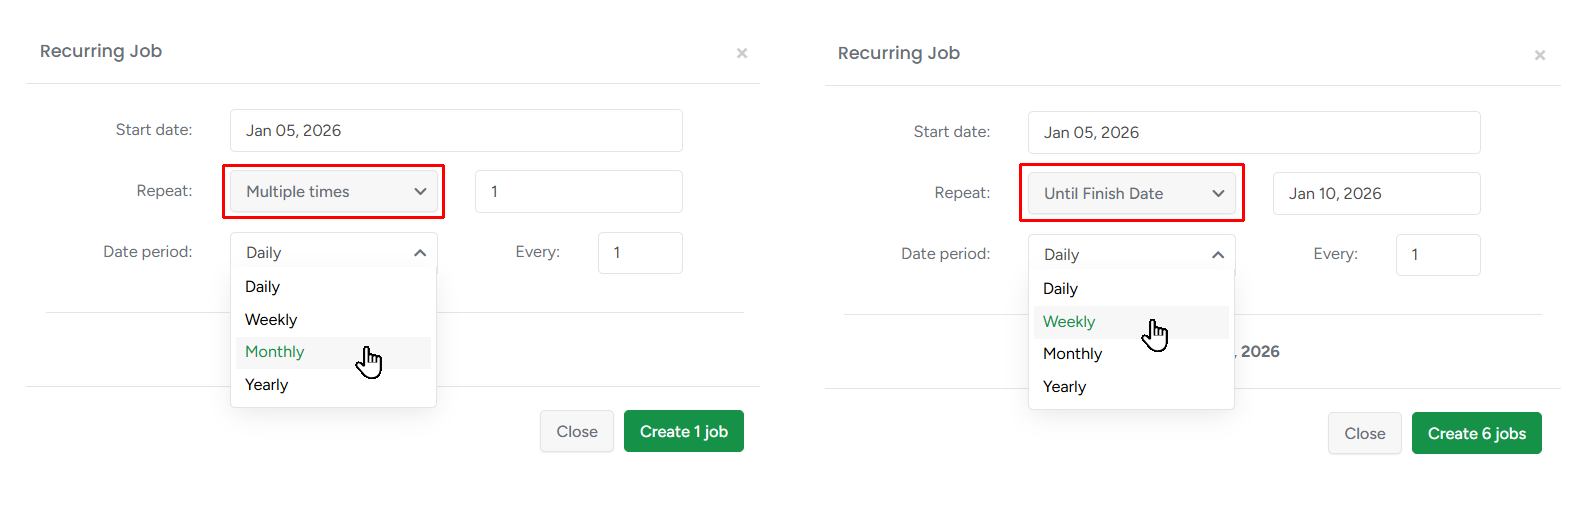
After saving, the system will create an "unscheduled job" which you can drag and drop to a crew schedule.
You can read about how to do this in detail in a separate article.
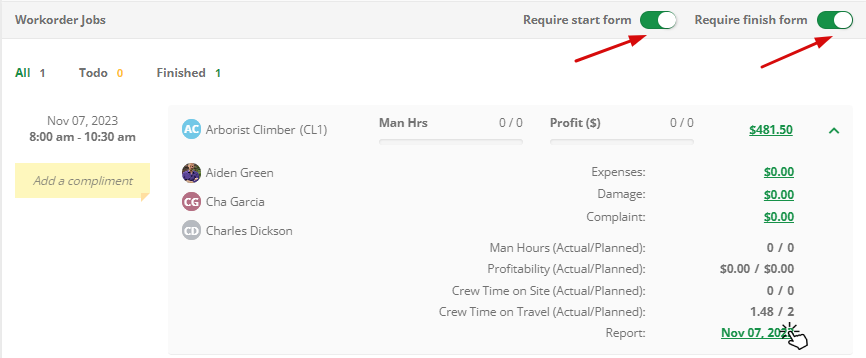
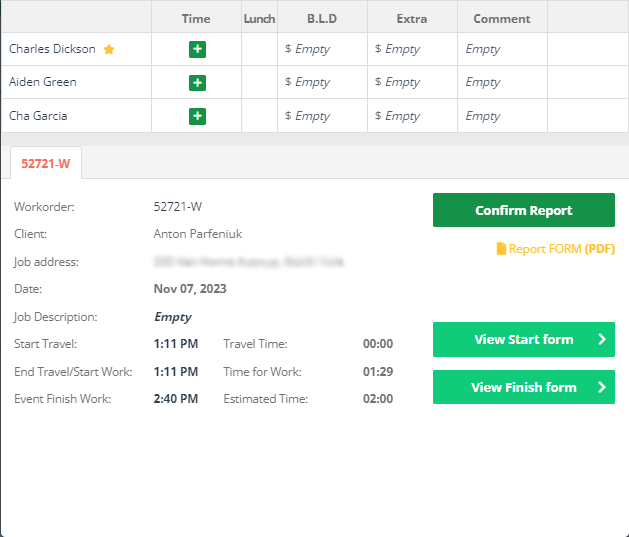
- To view the Workorder report and Pre-job safety assessment, and finish work forms once the crew completes the job. To access the report, please click on the event date.
If the job start and finish forms for a specific Workorder are not mandatory, they can be disabled. This will save some time for the crew leader on-site. Click here to learn more about forms
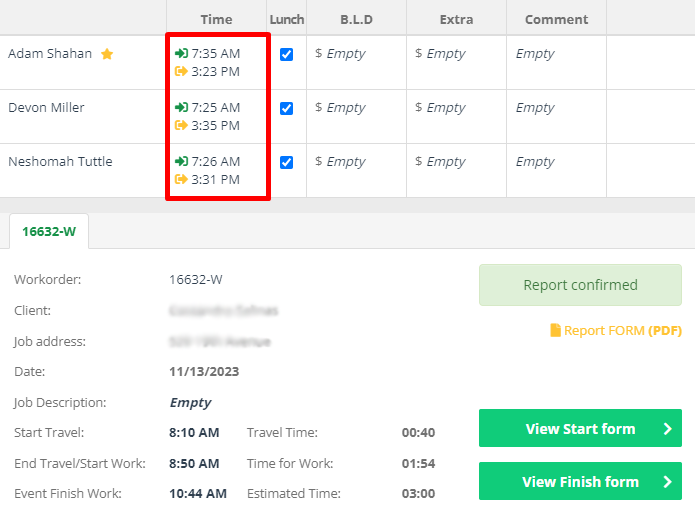
In the pop-up window, you can add the employee's clock-in and clock-out time, edit the event's start and finish time, view start and finish forms, report expenses, and leave comments.
The total man-hours and profit for the event are included in the reports. The calculations rely on determining the coefficient, representing the percentage of the team's working day dedicated to a specific task on the Crew Schedule.
Let's consider an example: 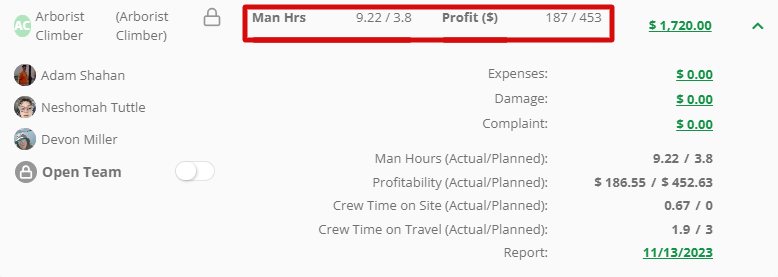
As evident from the screenshot, the work order event occurred on the 13th of November. On the Crew Schedule for that day, the team was assigned two jobs: one from 8:30 am to 10:45 am and another from 10:45 am to 2 pm. Therefore, according to the Crew Schedule, the team was expected to work for a total of 5 hours and 30 minutes. The report in our example pertains to W-16632.  According to the schedule, this job was planned to take 2 hours and 15 minutes, accounting for 41% of all scheduled work for the day. Therefore, to calculate the actual man-hours, the system aggregates the total work time for each crew member throughout the day and multiplies it by 41%. As depicted in the screenshot below, the crew consists of three members, and the sum of their man-hours is 22.53.
The employee's working hours are taken from the Payroll Time Tracker
The result of multiplying 22.53 by 0.41 is 9.22 man-hours, which is displayed on the workorder report.

Actual Hours Calculation
You can change the way actual hours are calculated in the Company Management → Schedule Preferences Management → Actual Hours Calculation Method.
- Crew Clock-in/out hours - sums all clock-in/out hours of workers assigned to the crew
- Job Report hours - uses Time On Site from the Job Report multiplied by the actual number of workers who performed the job. Time On Site itself is dependent on the Schedule Report Time On Site setting from the company management(includes or excludes travel time).
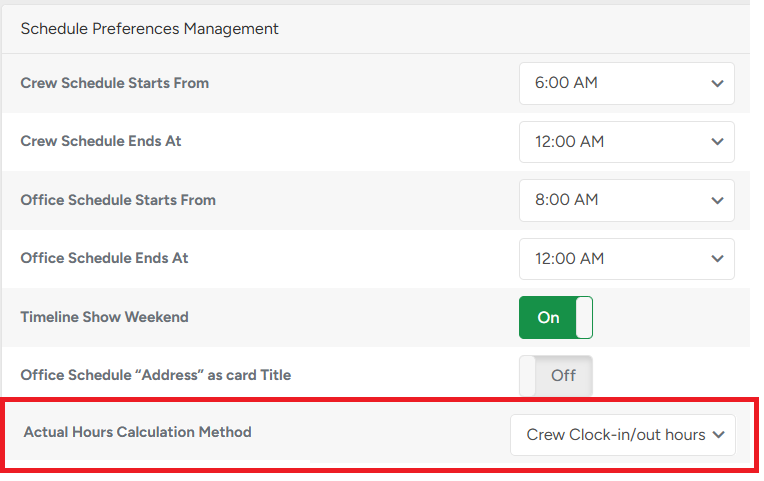
The selected method affects only the Actual Hours calculation on Crew Schedule Statistics
Job cost recalculation
If one service needs to be scheduled over several days, therefore creating several jobs, the total price in job calculations will be multiplied by the number of scheduled jobs (1).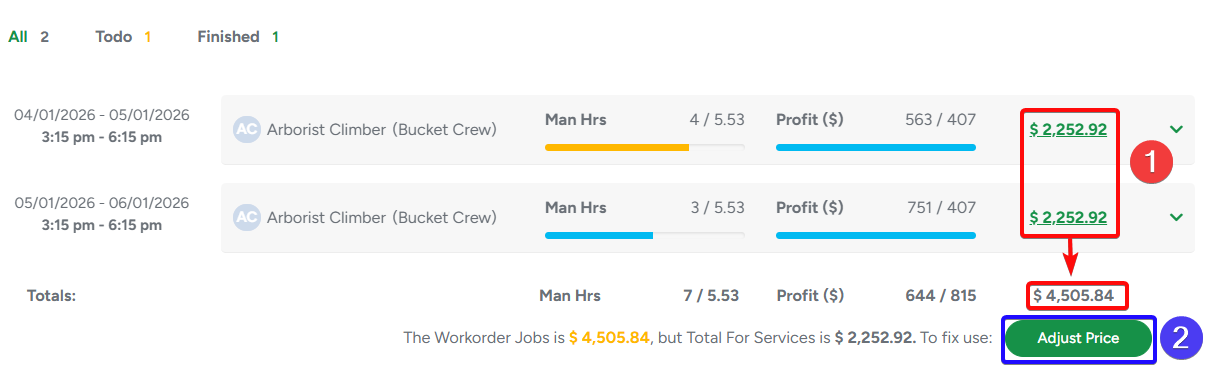 But you can always recalculate it based on reported man-hours.
Just click on the "Adjust price" (2) button.
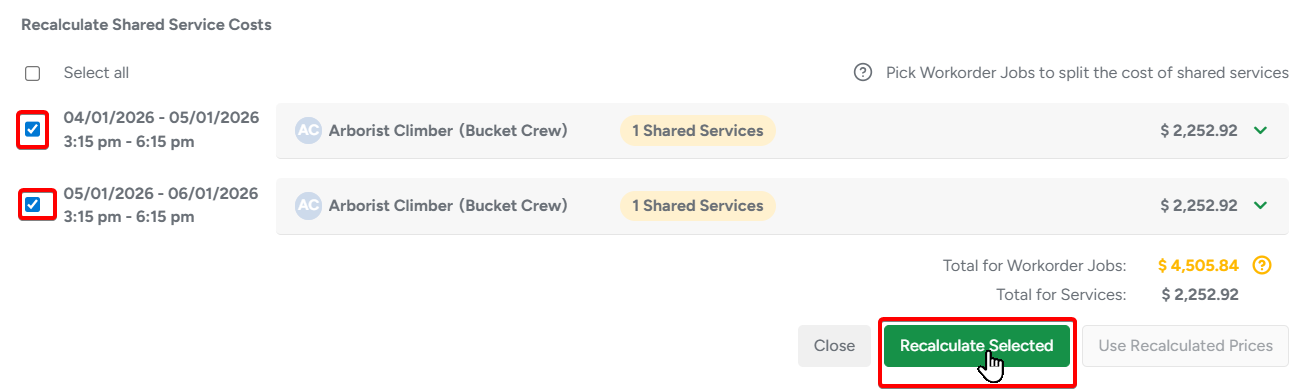
This will open the modal window with reported jobs. Select the reported jobs, and click "Recalculate selected".
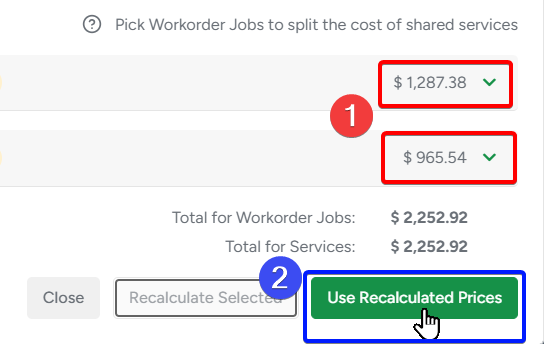
The total for each job will be recalculated based on the reported hours (1). If the calculations are correct, click on the "Use recalculated prices" button (2) to apply changes.
To learn more about the next project step - invoices please get acquainted with our Creating an Invoice and Adding Payments article.