
You can view the crew schedule in a daily, weekly, or monthly mode or access the timeline.
- To change the mode, pick the preferred one from the options at the top left corner.
- To see the scheduled appointments for today, click on the Today button.
- Use the arrows to access the scheduled jobs for the previous or the next day/week/month, depending on the selected mode.

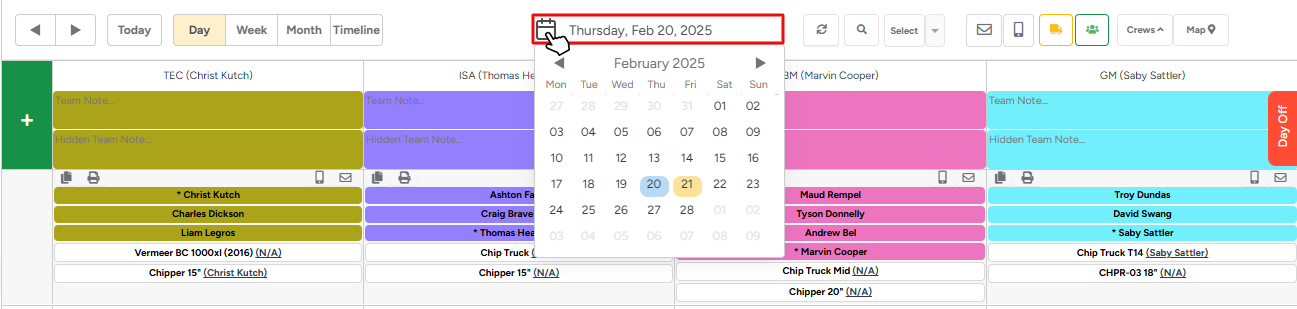
- Alternatively, you can pick the required day/week/month (based on the view mode) directly from the calendar.
Day Mode
In the Day mode, you can schedule and review jobs for a particular date. The options at the top right side of the page are unique for this mode: 
- The Update button. Click it to refresh the page.
- The Search button. Click it to search for a particular workorder on the schedule board.
- The Select button. Click it to choose multiple jobs on the schedule. You can learn more about its functionality here.
- The Email and SMS notification buttons. Click it to send notifications to all clients that have scheduled jobs for the day simultaneously. For more details, check this article.
- The Free Equipment button. Click it to access the list of all free equipment. If you want to add more equipment to a crew, you can drag and drop them from here to the required crew.
- The Free Members button. Click it to access the list of all free members. If you want to add more members to a crew, drag and drop employees to the required crew.
- The Crews button. Click it to show/hide additional rows with crew members and equipment.
- The Map button. Click it to access the scheduled jobs on the map.
- To view the statistics for the day, please click on the Statistics button at the bottom left side of the page.
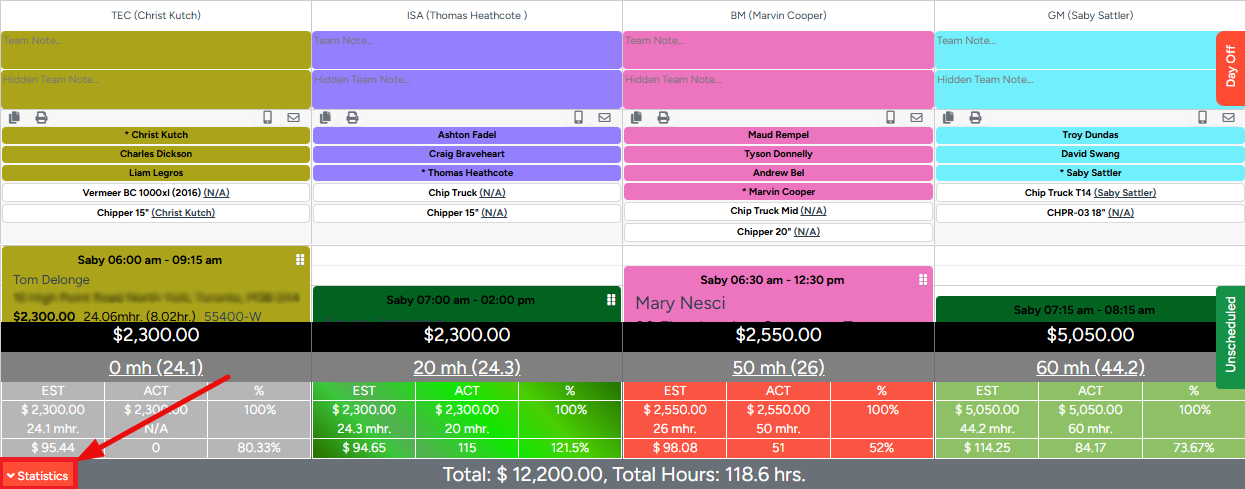
The first line shows the total sum of all the team's job events for the day. The numbers change if the job price for services is edited manually.
The second line shows how many hours the team has worked for the day, while the number in parentheses indicates the estimated time for jobs. The number of actual hours can be edited manually for more precise statistics.
Please be advised, that the system retrieves the working hours of each team member from the time tracker to display the actual operation time of the crew.
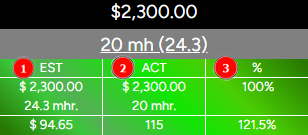
- The first column under those lines shows the estimated sum of services, how much time has been estimated for the crew to spend on site (estimated mhr), and the estimated cost of 1 mh at the bottom. The system calculates the rate by dividing the sum of services by the estimated job work time (mhr).
- Similar to the first column, the second column shows the Actual value of services calculated by the system based on its data.
- The last column shows the profit or difference between the estimated and actual data in percentage.
The color code of the statistics is based on the man-hour rate (the bottom row).
- Bright green - the rate is above $100.
- Dark Green - the rate is between $75 and $100.
- Yellow - the rate is between $67 and $75.
- Red - the rate is below $67.
- Gray - the calculation is not possible/ the job is not finished.
Week Mode
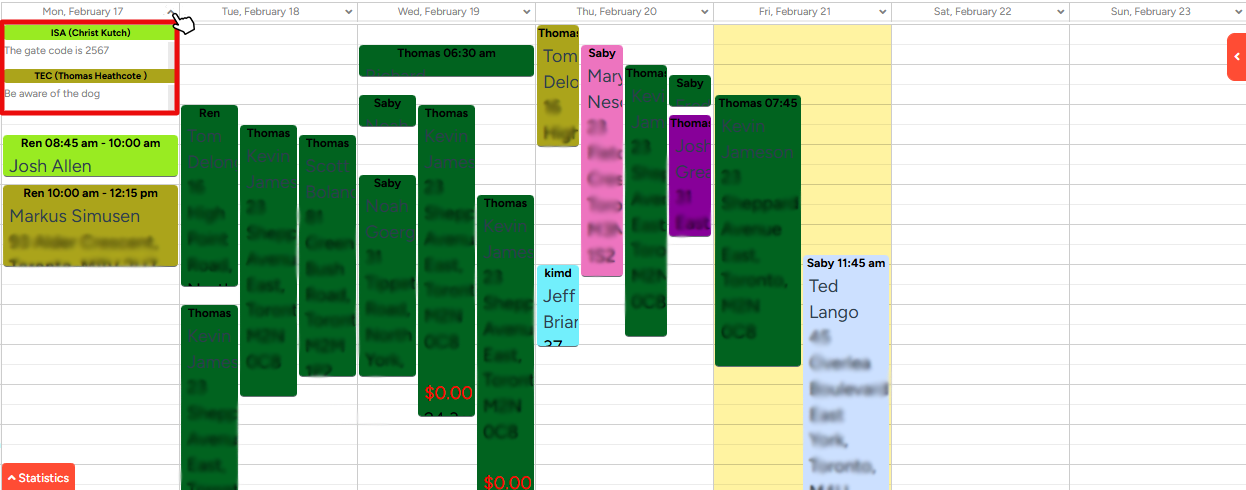
In the Week mode, you can filter the weekly crew schedule based on the assigned team leader, crew members, and crew type.

Note that if you use the filters for crew leaders and crew types, you will see the statistics for the filtered data.
It's also possible to see all crew notes for the week. Click the small arrow sign next to the date to summon a pop-up window, which contains notes for each crew for the day, and also displays the crew’s name, type, and color.
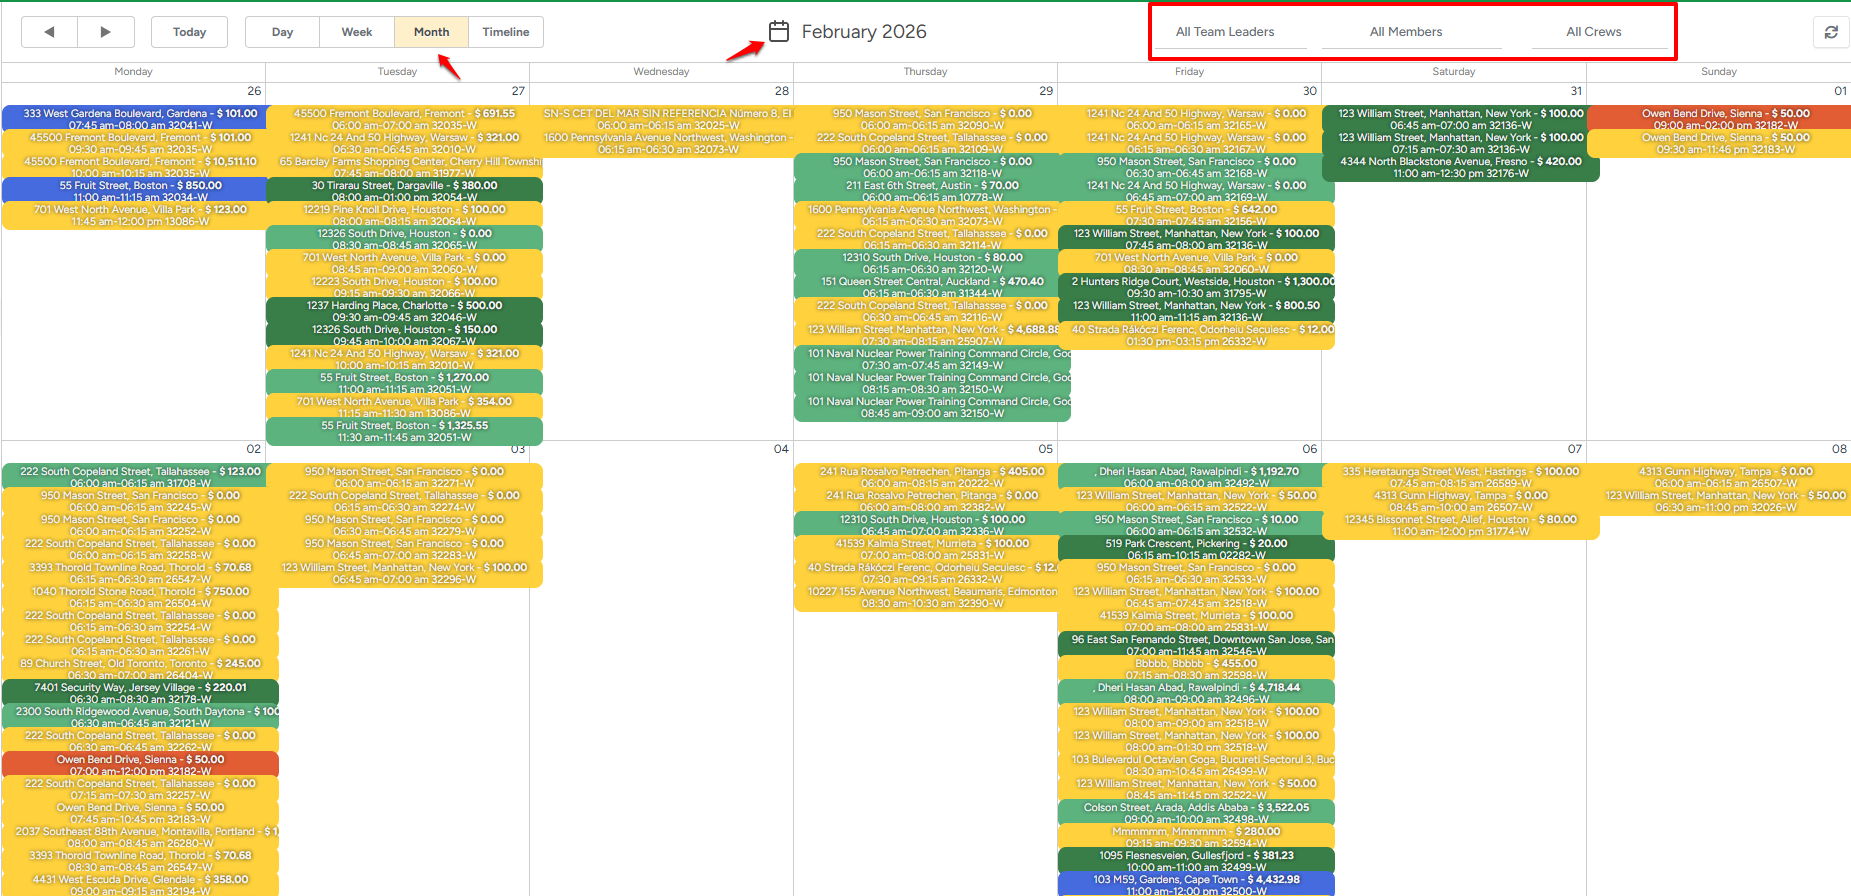
Month Mode
The Month mode provides a high-level snapshot of the crew schedule over an entire month. While it doesn’t include additional interactive functions, it serves as a valuable overview for managers to quickly assess job distribution, crew availability, and key events on specific dates. This mode helps in identifying scheduling patterns, tracking past assignments, and planning with a broader perspective.
You can now filter jobs directly in the Month View of the Crew Schedule, just like you can in the Week View. This makes it easier to focus on specific crews, team leaders, or crew members when reviewing your schedule. The filters work the same way as they do in the Week View. If you switch between Day, Week, Month, or Timeline views, your selected filters will remain active.
In the Month View, you will see three dropdown filters at the top of the screen:
Team Leaders
Members
Crews
By default, all filters are set to the following. If you leave the Crew Schedule and return later, the filters will reset to their default settings:
All Team Leaders
All Members
All Crews
This means the schedule will show all jobs for the selected month.
Month Mode Filter by Team Leader
Select a specific Team Leader to see only jobs assigned to crews led by that person.
Select No Team Leader to see jobs assigned to crews without a team leader.
Month Mode Filter by Member
Select a specific Member to see only jobs where that person is assigned as part of a crew.
Month Mode Filter by Crew
Select a specific Crew to see all jobs assigned to that crew.
Month Mode Using Multiple Filters Together
You can combine filters to narrow down your results.
For example:
Select a specific Team Leader and a specific Crew.
Filter by a Member within a particular Crew.
The schedule will automatically update to show only jobs that match your selected filters. Crews with no scheduled jobs during the selected month will not be displayed.
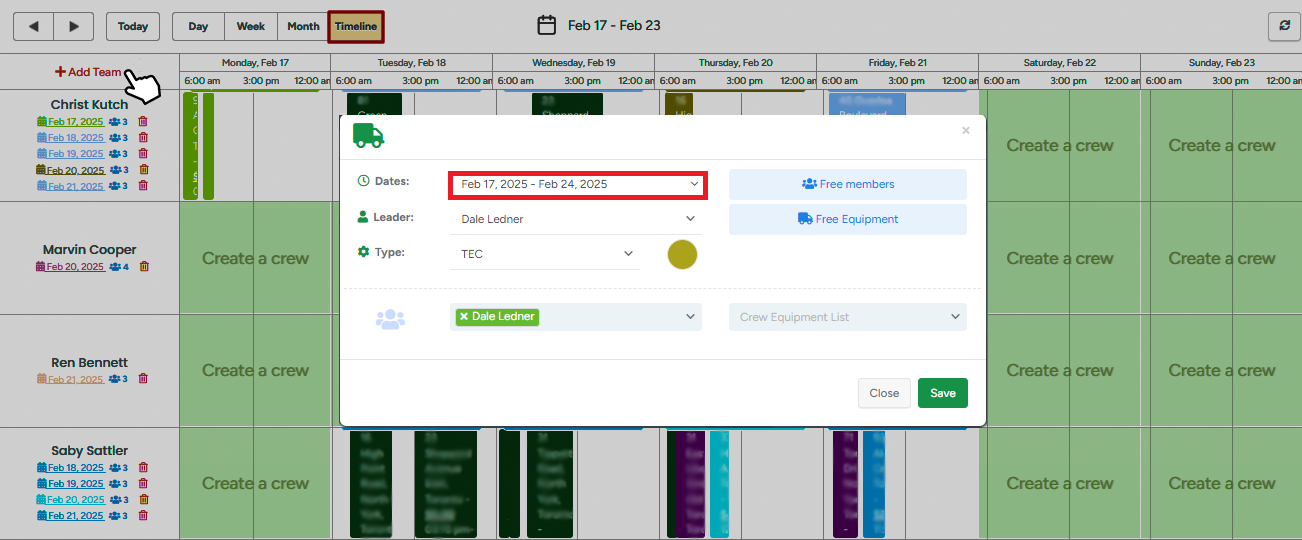
Timeline Mode
The timeline view works perfectly in cases when you need to schedule a job that is going to take more than a day.
- To create a crew in the Timeline mode, click the Add Team button. Unlike in the Day mode, you can add a team for a specific period here.
Note that you can add available crew members and equipment from the Free members and Free equipment sections.
After creating a team within the required period, it's possible to schedule a job for that whole period, or a specific slot (day).
- To schedule a job, please click on the available timeslot, hold, and drag it down.
After a job is scheduled, you can drag it around to fit your time requirements or assign it to another crew.
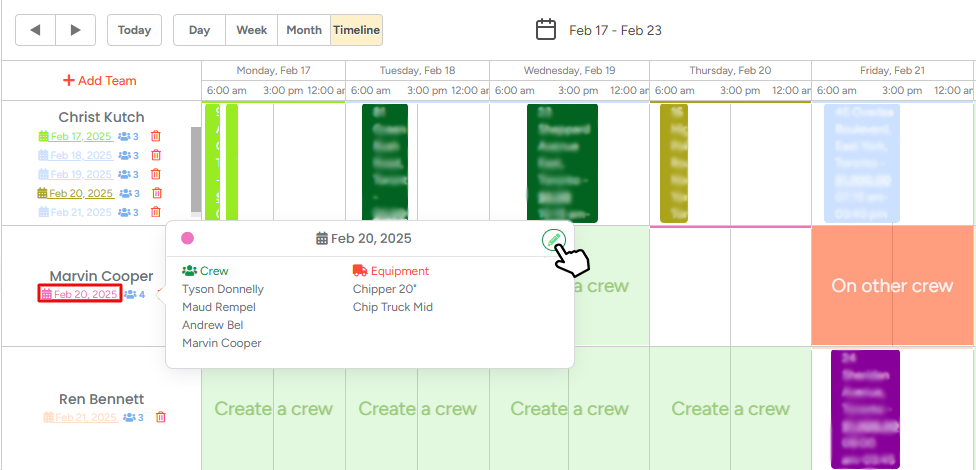
Next to the team, in the schedule job section, you can notice the colorful squares:
- Create a Crew - implies the crew has free time. A new job can be scheduled.
- On Other Crew - means the crew leader is scheduled for another job at that time.
- Day Off - means that the crew leader is off for that day.
A new window with crew details appears if you click the date under the crew lead’s name.
- To edit the crew details, click on the Pencil button.
- To delete a crew, click on the Bin button.
Absent employees
Employees can be marked as absent from the Free Members window that opens when you click the red Day Off button at the top right corner. The feature is accessible from day and week modes.
In the Day mode:
- to mark an employee as Absent, choose their reason for absence from the menu next to the user's name. After that, they are moved to the Absent Members section.
- Below you can see the list of absent members for the day. They cannot be added to any crew. To remove a user from the Absent Members section, click the X next to the user's name.
- Alternatively, click the Plus button from the Absent Members section and enter the day off details in the pop-up window. After that, click the Create button.

You are also able to see how many free members you have at your disposal. The number changes in real-time once you assign new members to the crew.
In the Week mode:
- A small calendar will display a list of employees and the dates they worked on scheduled jobs.
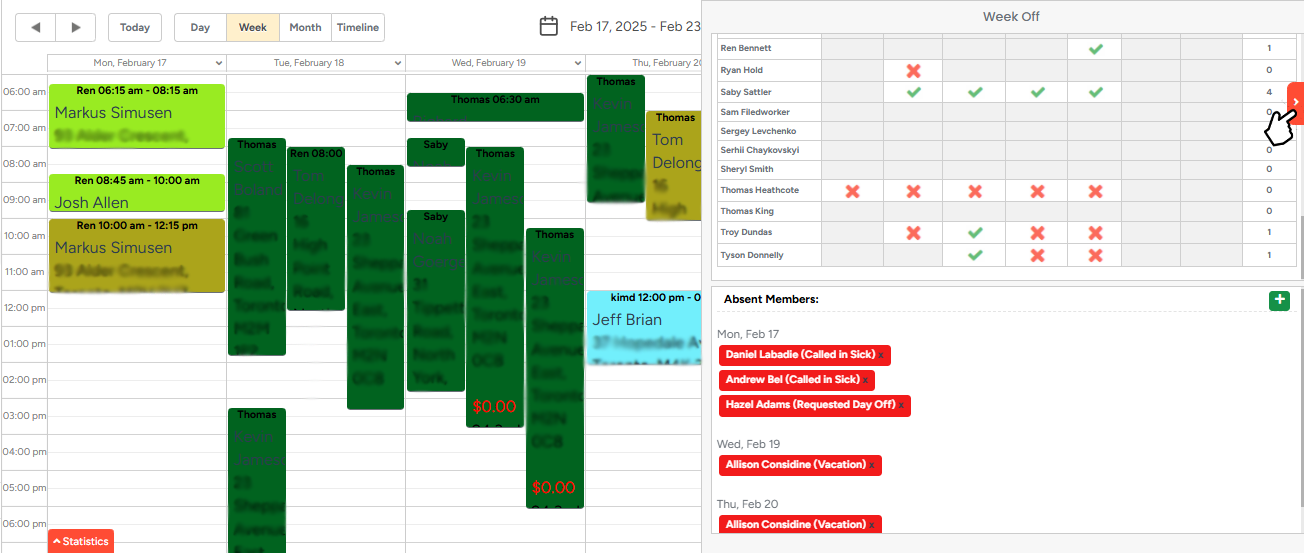
- The check mark means that the user was scheduled for a job and attended it.
- The cross sign means that the user was scheduled for jobs, but he didn’t show up (or he didn’t track his time)
- The gray cell indicates that the user wasn’t scheduled for any job for that day.
- The total week column shows the sum of attended working days that the person had this week.
- The total year column shows the number of attended working days that the person had in a year.
Click here to learn more about the absent days management.