Efficiently manage incoming leads using ArboStar’s website form integration options. This guide outlines both our traditional email parsing method and the request generation iframe form to help you choose the best solution for your needs.
Leads created from website forms using email parsing or a ready-to-go form will appear in Leads → Requests.
Email Parsing
The email parsing method enables you to process leads generated from your website forms through automated email handling. This approach simplifies setup and ensures compatibility with existing systems.
Setup Instructions:
Configure Emails FROM and TO:
- TO: Set your website form to send submissions to company_id@leads.arbostar.com (e.g., treecompany@leads.arbostar.com).
- FROM: Ensure the form sends emails from your default company email address (e.g., info@treecompany.com). Please make sure this email is added to list of emails in ArboStar system.
Include the Following Fields in the Email Body:
- Name
- Phone
- Street, City, Postal/ZIP
- Details (Add "--" to mark the end of the body).
Example Email Body:
Name: William Smith
Email: william.test@gmail.com
Phone: 7012345678
Street: 57 Main St
City: Grenada
Postal: 26055
Details: Hi there! I am looking for a quote.
--
By default, the company’s office coordinates in the address will be used. Please update the address manually and select it from the autocomplete options for smoother logistics.
Ready-To-Go Form
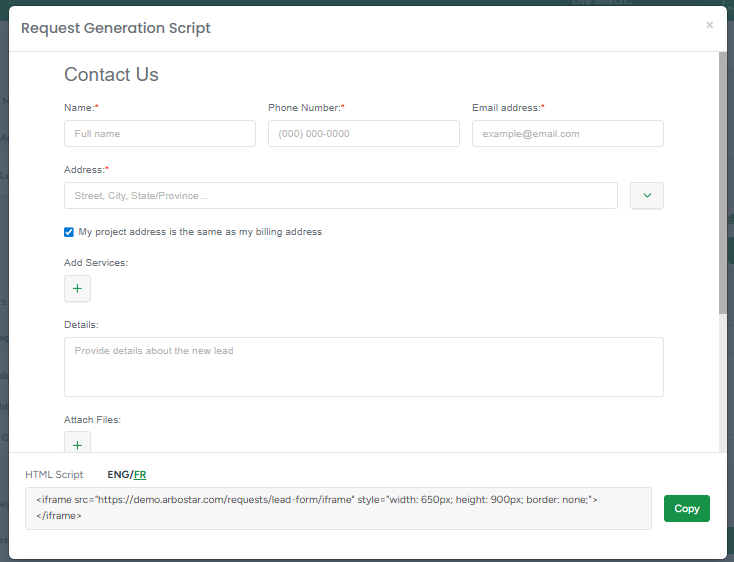
The form allows you to embed a lead generation form directly into your website. It offers a user-friendly interface and customization options, making it easy to capture and process leads.

Features:
- Users can fill in the form to provide their contact details, project address, and service requested with details. The option to use the same address for both is available with a simple checkbox.
- Users can select services, products, or bundles by adding items through a plus button. You can select what item will be available for your clients on the form by enabling the "Show on Request Generation Form" setting on each service, product, or bundle.
- Essential fields, such as Name, Email, Phone, and Address, are required for submission.
- This can be in English and French.
Setup Instructions:
- Navigate to Company Management.
- Locate the Request Generation Script option. Here, you can preview the form and copy the provided HTML code for integration into your website.
- Use the "Preview and Copy" button to view the form and obtain the script code.
- Copy the script and insert it into your website as an HTML element. You can customize form size by editing width, height, and changing border style.
Example Form Code:
To embed the form into your website, use the following code as an example:
<!DOCTYPE html>
<html>
<head>
<title>Request Generation Script</title>
</head>
<body>
<iframe src="https://[YOUR_COMPANY_ID].arbostar.com/requests/lead-form/iframe"
style="width: 650px; height: 900px; border: none;">
</iframe>
</body>
</html>
Replace [YOUR_COMPANY_ID] with the unique ID of your company. You can find your company’s ID in the provided script code within the Request Generation Script section.
Example for Website Builders:
- WordPress: To add the form, navigate to the desired page or post, click on the “+” button to add a block, search for "HTML," select the "Custom HTML" block, and paste the iframe code into the block. Save or update your page to apply the changes.
- Wix: In the Editor, click on the “+” button, select “Embed,” and choose “Embed a Widget.” Paste the iframe code into the widget box and adjust the size or placement as needed. More details...
- SquareSpace: Go to the page where you want to add the form, click on an insertion point, and select “Code” from the block menu. Paste the iframe code into the Code Block, ensure the “Display Source” option is unchecked, and save the changes. More details...
- Google Sites: Open the Google Sites editor and navigate to the page where you want to add the form. Click on “Insert” in the menu, then select “Embed.” Choose the “Embed Code” option, paste the iframe code, and click “Next.” Adjust the placement and size of the embedded form as needed before publishing the site. More details...
By following these steps, you can seamlessly integrate the form into your website to start capturing leads effectively.
API Integration
For advanced users and automation needs, ArboStar provides a direct API endpoint for submitting lead requests. This method allows seamless integration with external systems.
API Endpoint:
https://[YOUR_COMPANY_ID].arbostar.com/api/requests/create
Required Setup:
- Generate an API Key:
- Navigate to Company Management.
- Locate the API Access section and generate a new key if needed.

- Make a POST request to the endpoint with the following JSON payload:
Example Request:
{
    "name": "William Smith",
    "email": "william.test@gmail.com",
    "phone": "7012345678",
    "details": "Large oak tree needs trimming, possible hazard to house",
    "city": "Grenada",
    "address": "57 Main St",
    "postal": "26055",
    "state": "CA",
    "country": "United States",
    "address_notes": "White house with red door, gate code #4455"
}
Required Fields:
- name (String) – Required
- email (String) – Required
- phone (String) – Required
- city (String) – Required
- address (String) – Required
- postal (String) – Required
- state (String) – Required
- country (String) – Required
Optional Fields:
- details (String) – Additional request details
- address_notes (String) – Notes about the address (e.g., “Gate code #4455”)
Example cURL Request:
curl --location --request POST 'http://[YOUR_COMPANY_ID].arbostar.com/api/requests/create' \
--header 'Accept: application/json' \
--header 'Content-Type: application/json' \
--data-raw '{
"name": "William Smith",
"email": "william.test@gmail.com",
"phone": "7012345678",
"address": "57 Main St",
"city": "Grenada",
"state": "CA",
"country": "United States",
"postal": "26055",
"details": "Large oak tree needs trimming, possible hazard to house",
"address_notes": "White house with red door, gate code #4455"
}'
Integration with Third-Party Services:
If you are using a third-party service like Specialty Answering Service, follow their Webhook Integration Guide to configure the API request.
