These release notes are exclusively for the upgraded systems. Our comprehensive strategy encompasses migrating all systems to the upgraded version.
Updated Client Profile and Assigning contacts
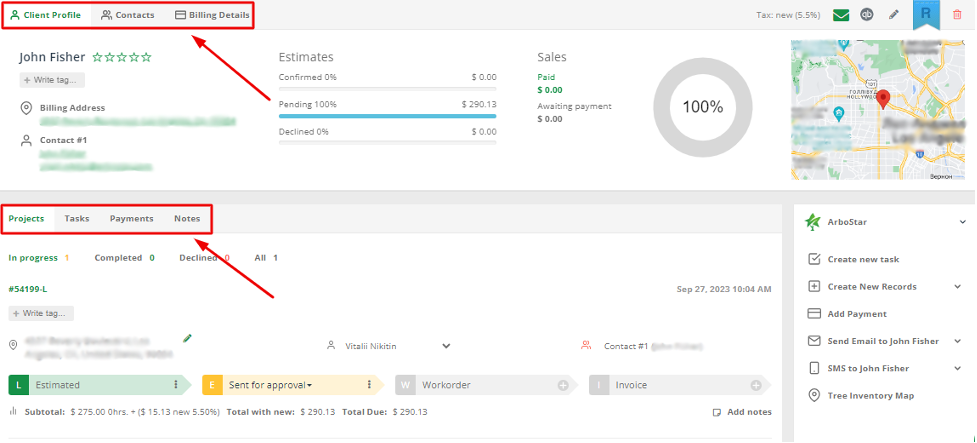
The improved client profile makes the work process much easier and more intuitive. The tabs at the top and the bottom of the page were particularly designed to fasten the navigation through the system.
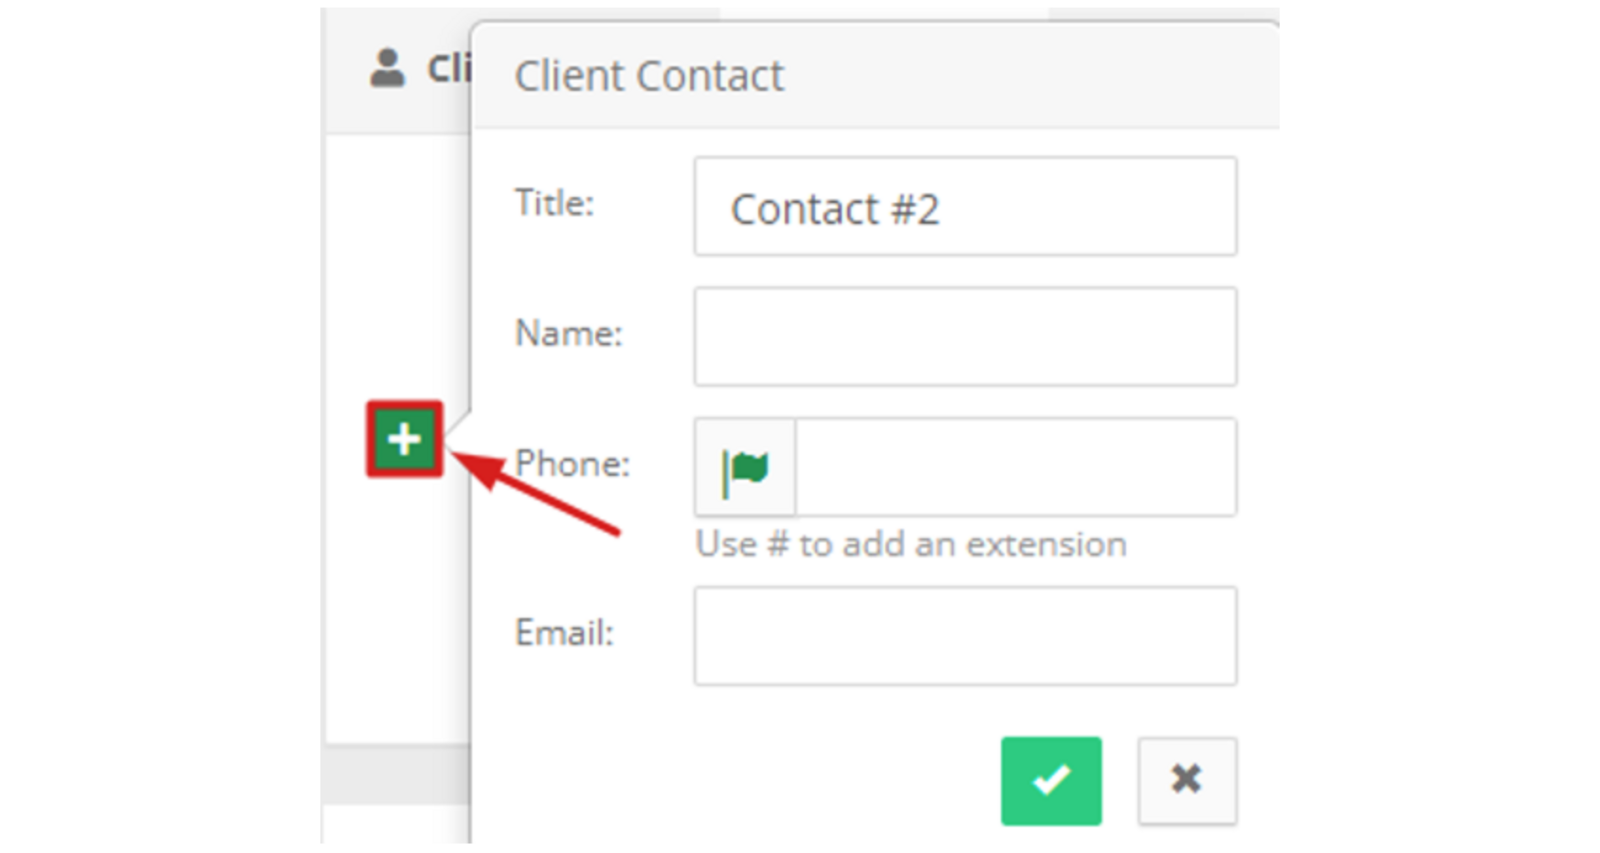
To add a new contact, please navigate to the corresponding tab and press the green plus icon.
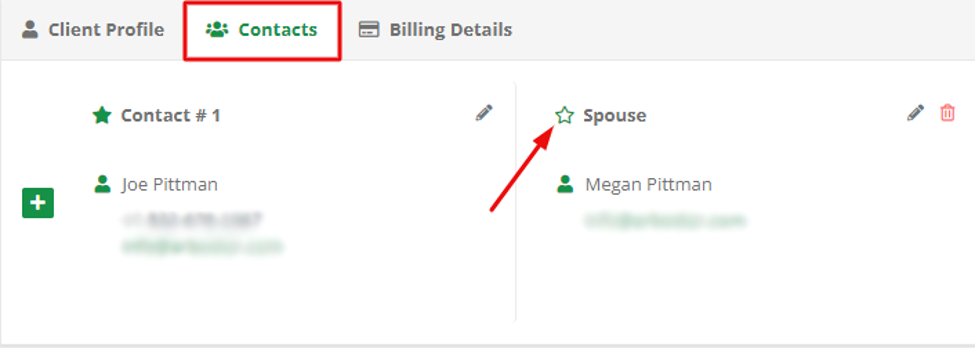
It is always possible to change the primary contact by pressing a Star icon in the Contacts tab.
You can still find the task and lead creation section with corresponding buttons at their usual place alongside with the Add payment, Send Email, and Tree Inventory buttons. The client’s notes are located on the side of the profile.
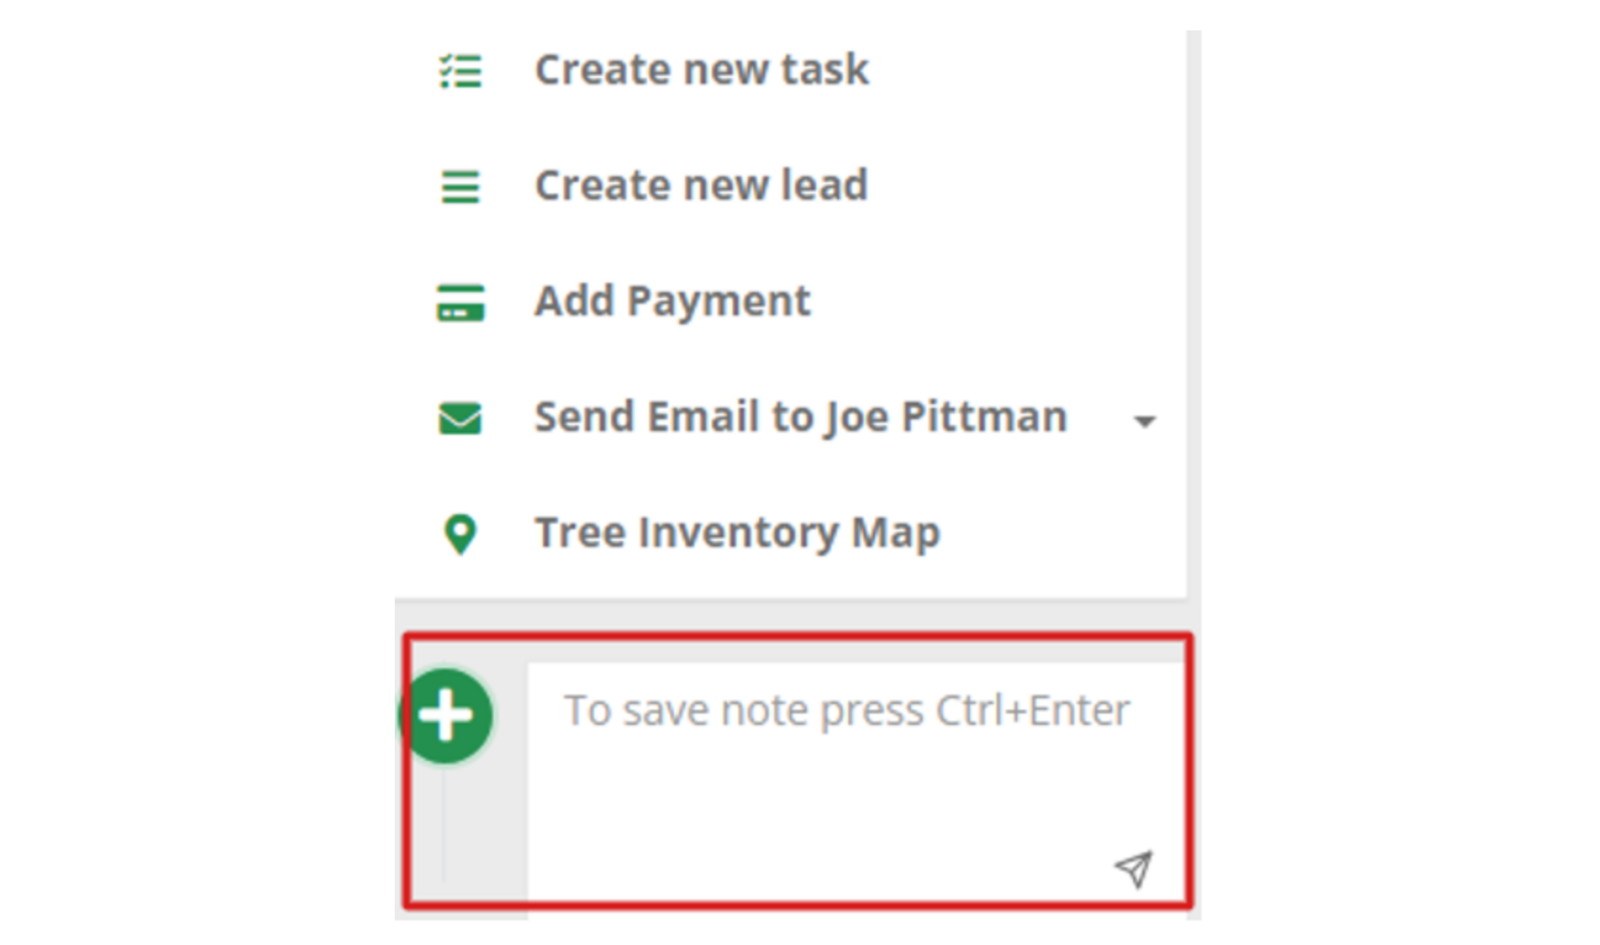
Leads appear in the Projects tab and that’s why it became extremely easy to track the stage of a project, assign a new contact, and change the statuses, all from the same page.
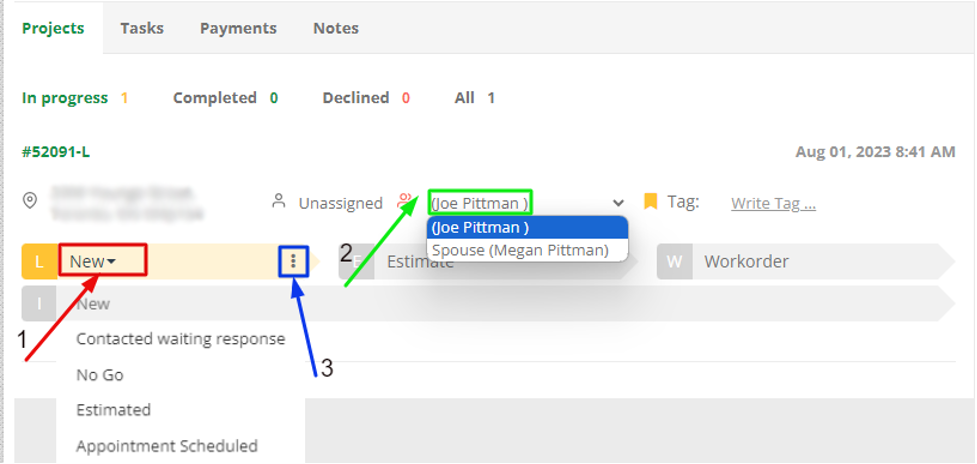
- To change the status of the lead, please click on the drop-down menu.
- To assign a contact for the project, please click on the client name and choose the person from the list. Please note that it’s possible to change the assigned contact at any project stage.
- To summon a pop-up menu click on the dots. The various options will appear: to open the lead’s profile; to create a new task for the lead; to create an estimate, or to delete the lead.
Once the Lead is estimated, the system will redirect you to the estimate page. Each step of the project and the assigned contact can be accessible from the same page by navigating through the tabs.
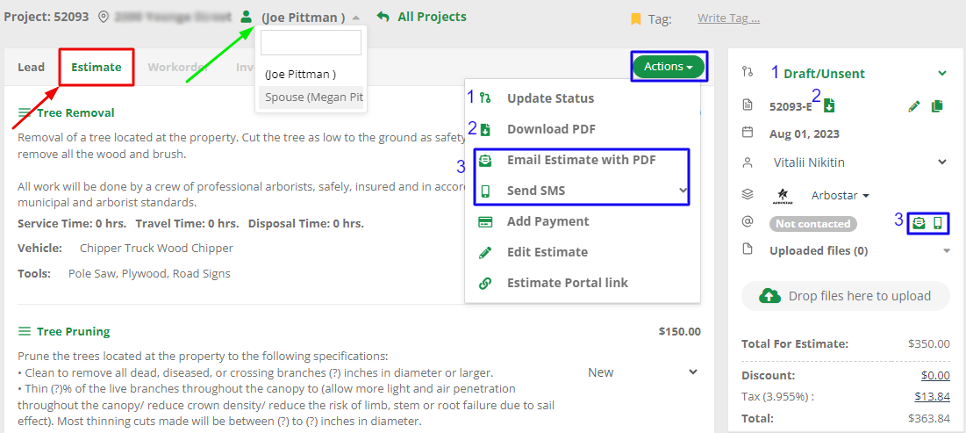
The dedicated Actions button contains the following estimate options:
- Update status
- Download PDF
- Send Emails or SMS are available at your disposal at the quick access panel.
Project step shortcut
You can skip each project step which can be a great time-saver for office managers in certain situations. To force create a project step, please hover your mouse over the step icon and press the newly appeared + sign.
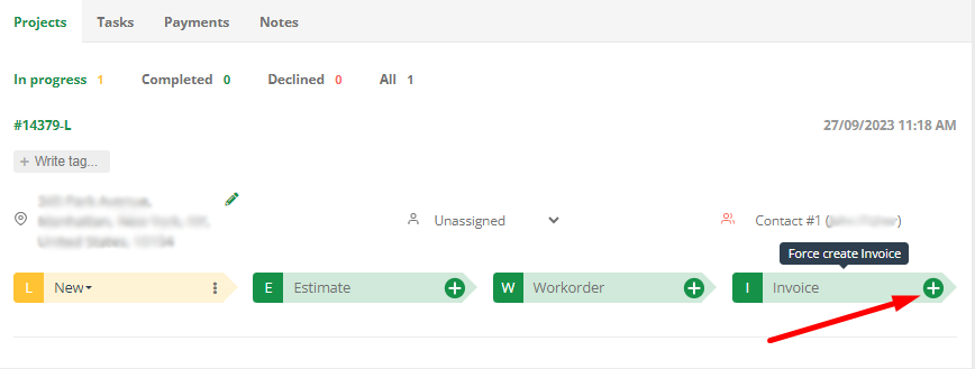
Please note that in case you are trying to skip the step but the lead was not estimated the system will ask you to fill out the estimate first.
Partial Invoicing
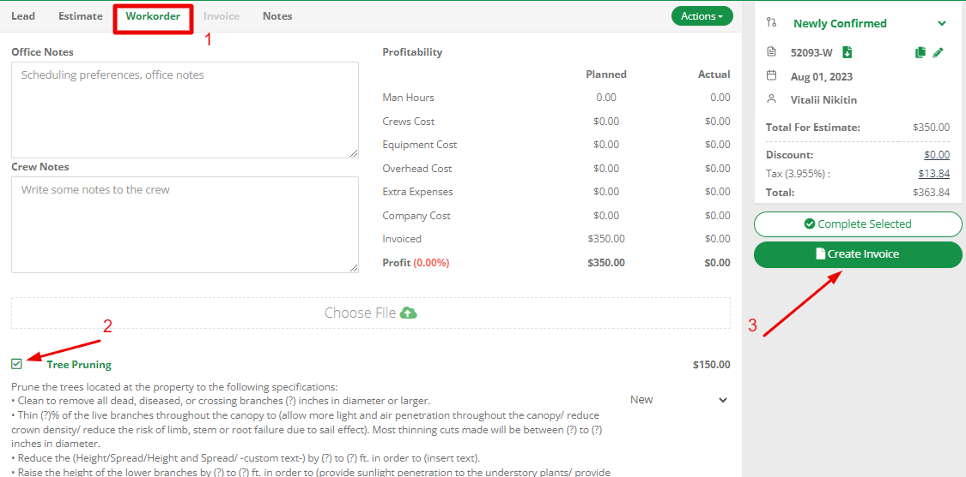
Partial Invoices can be issued for one or a couple of completed services from Workorder. Once the service(s) is marked as completed the Partial Invoice can be generated.
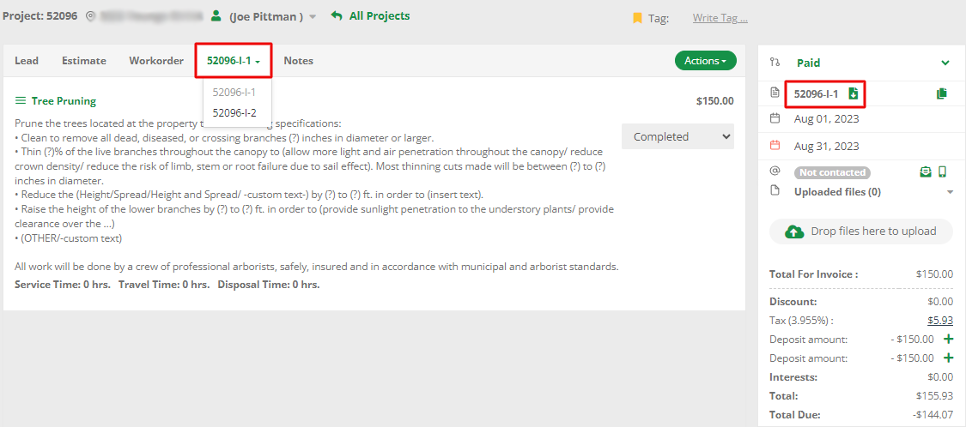
Each partial invoice is subsequently enumerated. Once both (or more) partial invoices are generated you’ll be able to switch between them from the drop-down menu.
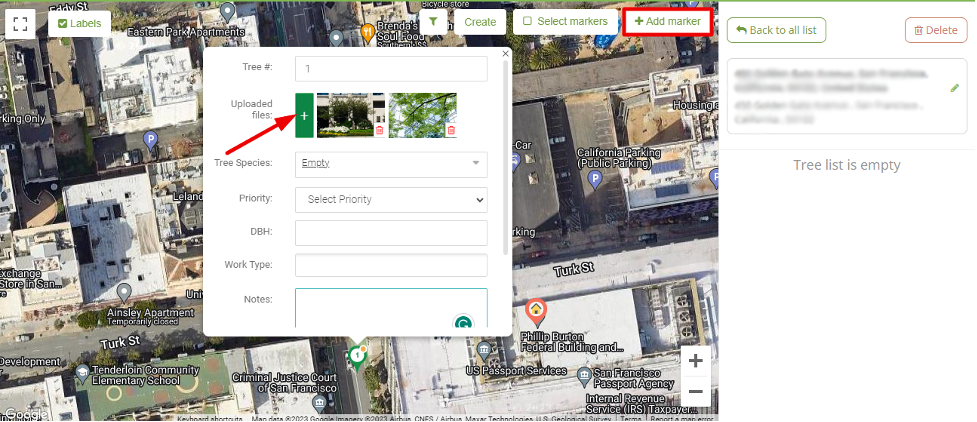
Multiple Photos for Tree Inventory
You are able to upload multiple photos for a tree pin on a Tree Inventory map. In case you decide to make an estimate from Tree Inventory the photos will be uploaded to the estimate automatically.
Limited Equipment Module access for Mechanic
By setting it to limited the user will no longer have access to the Actions buttons both in the Equipment and Services pages.

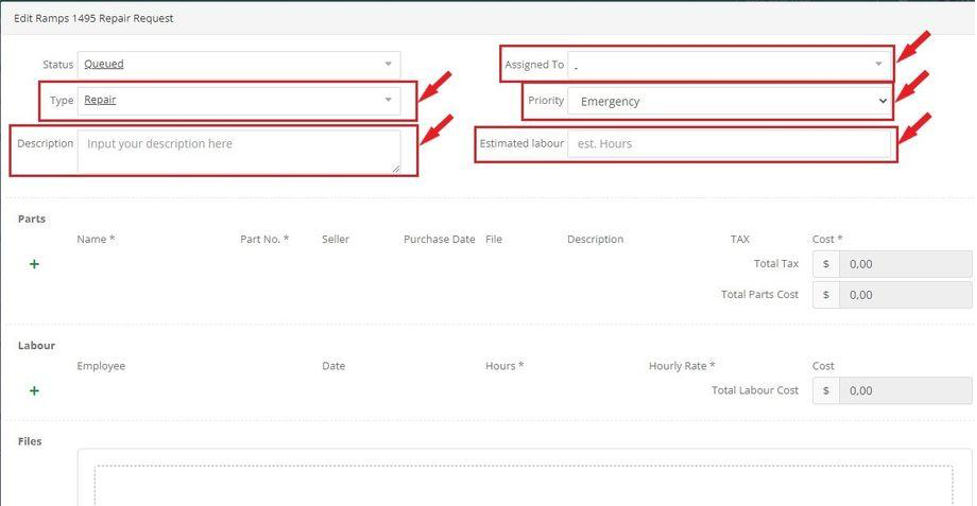
With this permission, the user who works with the equipment module will be able to see repair requests assigned only to him. In the Edit Repair request window the type of repair request, description, assigned to, priority, and estimated labor fields are going to be blocked for the user.
Bulk Booking
Bulk booking allows you to add multiple work orders to the selected time range. Please allocate a time range on the Crew Schedule, after that choose desired work orders in the modal and click Save. The allocated time range will then be divided by the number of work orders selected.
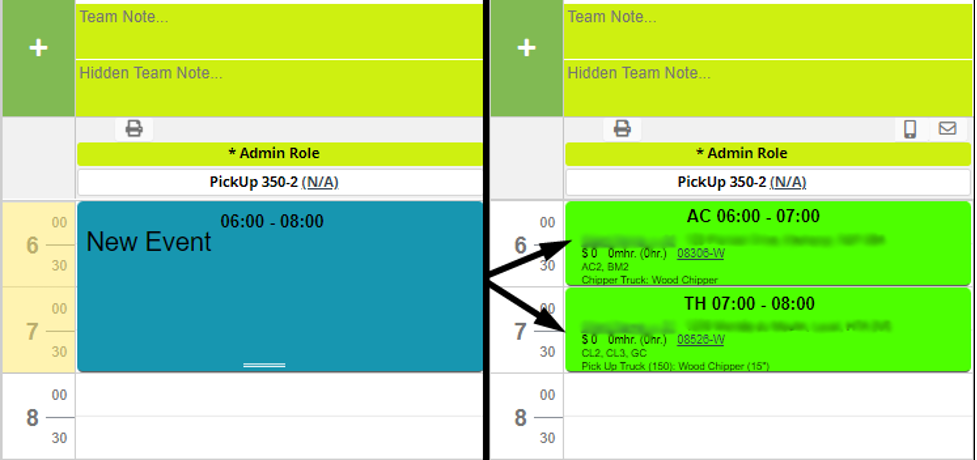
After choosing the time range, a modal window opens, where you can choose workorders and services in them. To select the service, you need to click on the price button, after that the workorder will be marked with a tick. The total number of selected workorders will be displayed above the Save button.
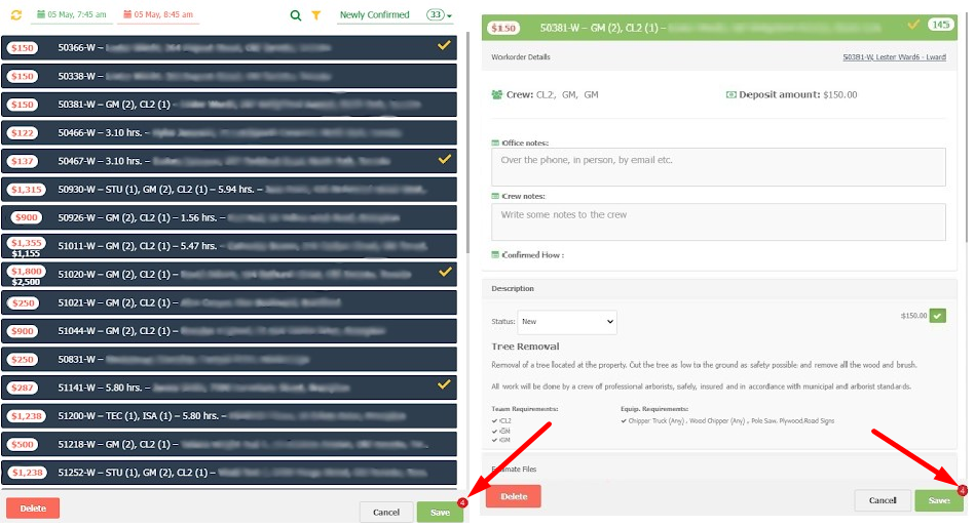
Please be advised that the number of selected workorders is limited by the size of the time range.
Multiple job event selection
You can select multiple work order events on the crew schedule to change their statuses simultaneously and/or delete the chosen jobs. Once the select button is pressed you’ll be presented with the option to choose the needed jobs among transparent events. After you finish selecting the workorders please click on the drop-down menu to see the expandable options.
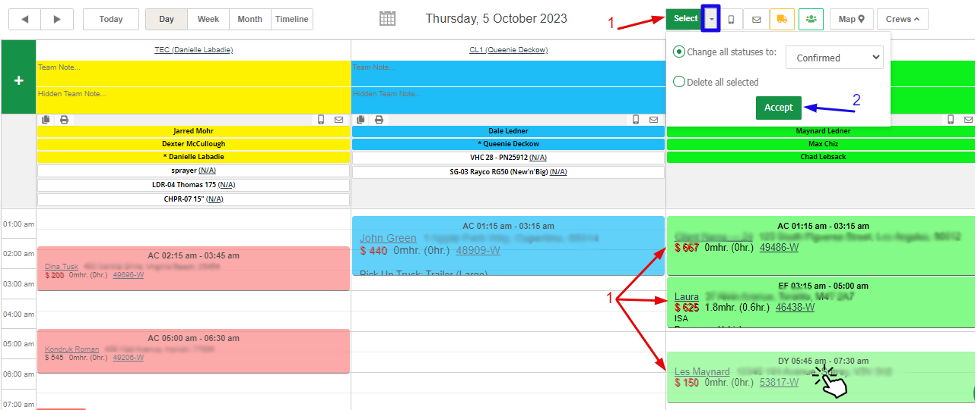
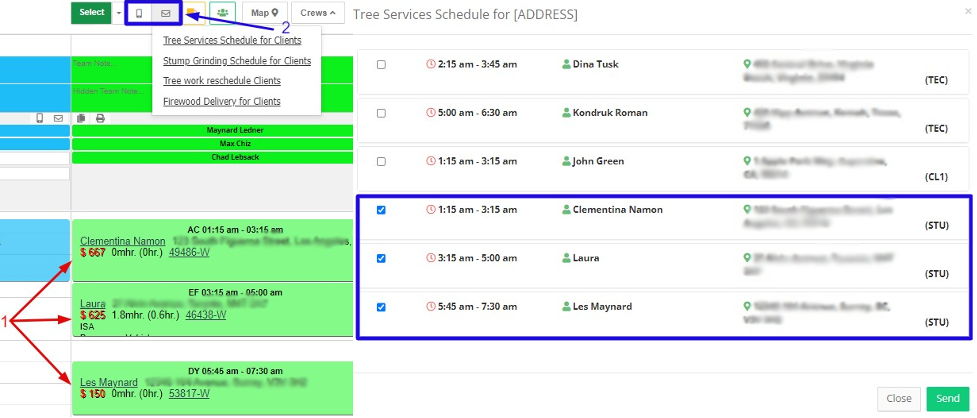
Please be advised that the job event selection applies to the mass SMS and Email distribution as well.
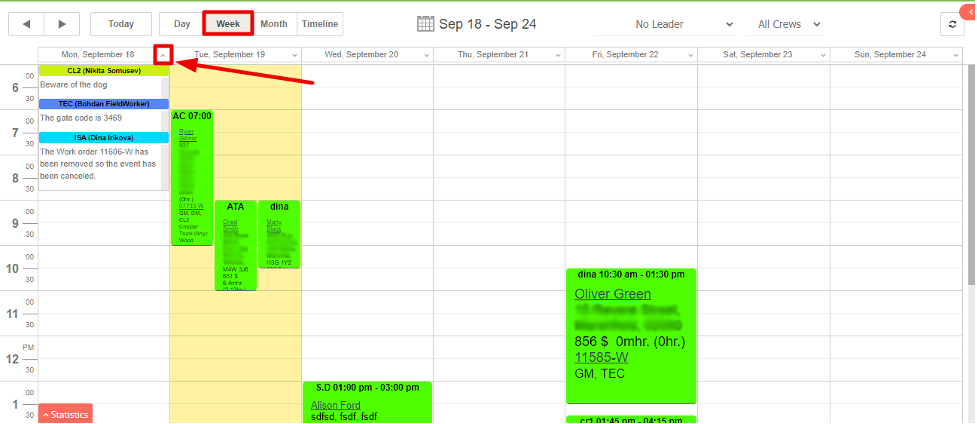
Weekly crew notes
The team notes are visible from the weekly crew schedule. The functionality is accessible by pressing on the small arrow sign next to the date. The pop-up window, which contains notes for each crew for the day, also displays the crew’s name, type, and color.
Weekly Day Off statistic
A small calendar will display a list of employees and the dates they worked on scheduled jobs.
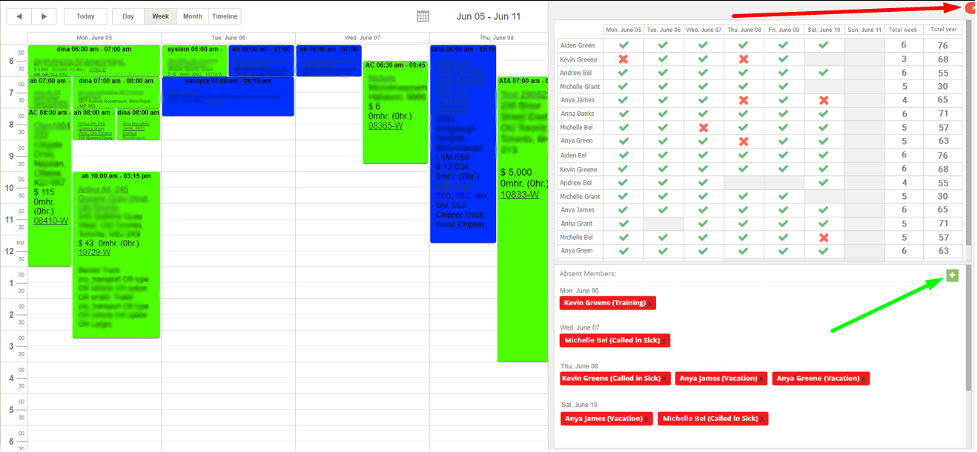
- The check mark means that the user was scheduled for a job and attended it.
- The cross sign means that the user was scheduled to jobs but he didn’t show up (or he didn’t track his time)
- The gray cell indicates that the user wasn’t scheduled for any job for that day.
- The total week column shows the sum of working days that the person had this week.
- The total year column shows the number of working days that the person had in a year.
Equipment and Tools on the Fieldworker Dashboard
The fieldworker can see what equipment and tools they need for today’s jobs on the Dashboard and the job profile page.
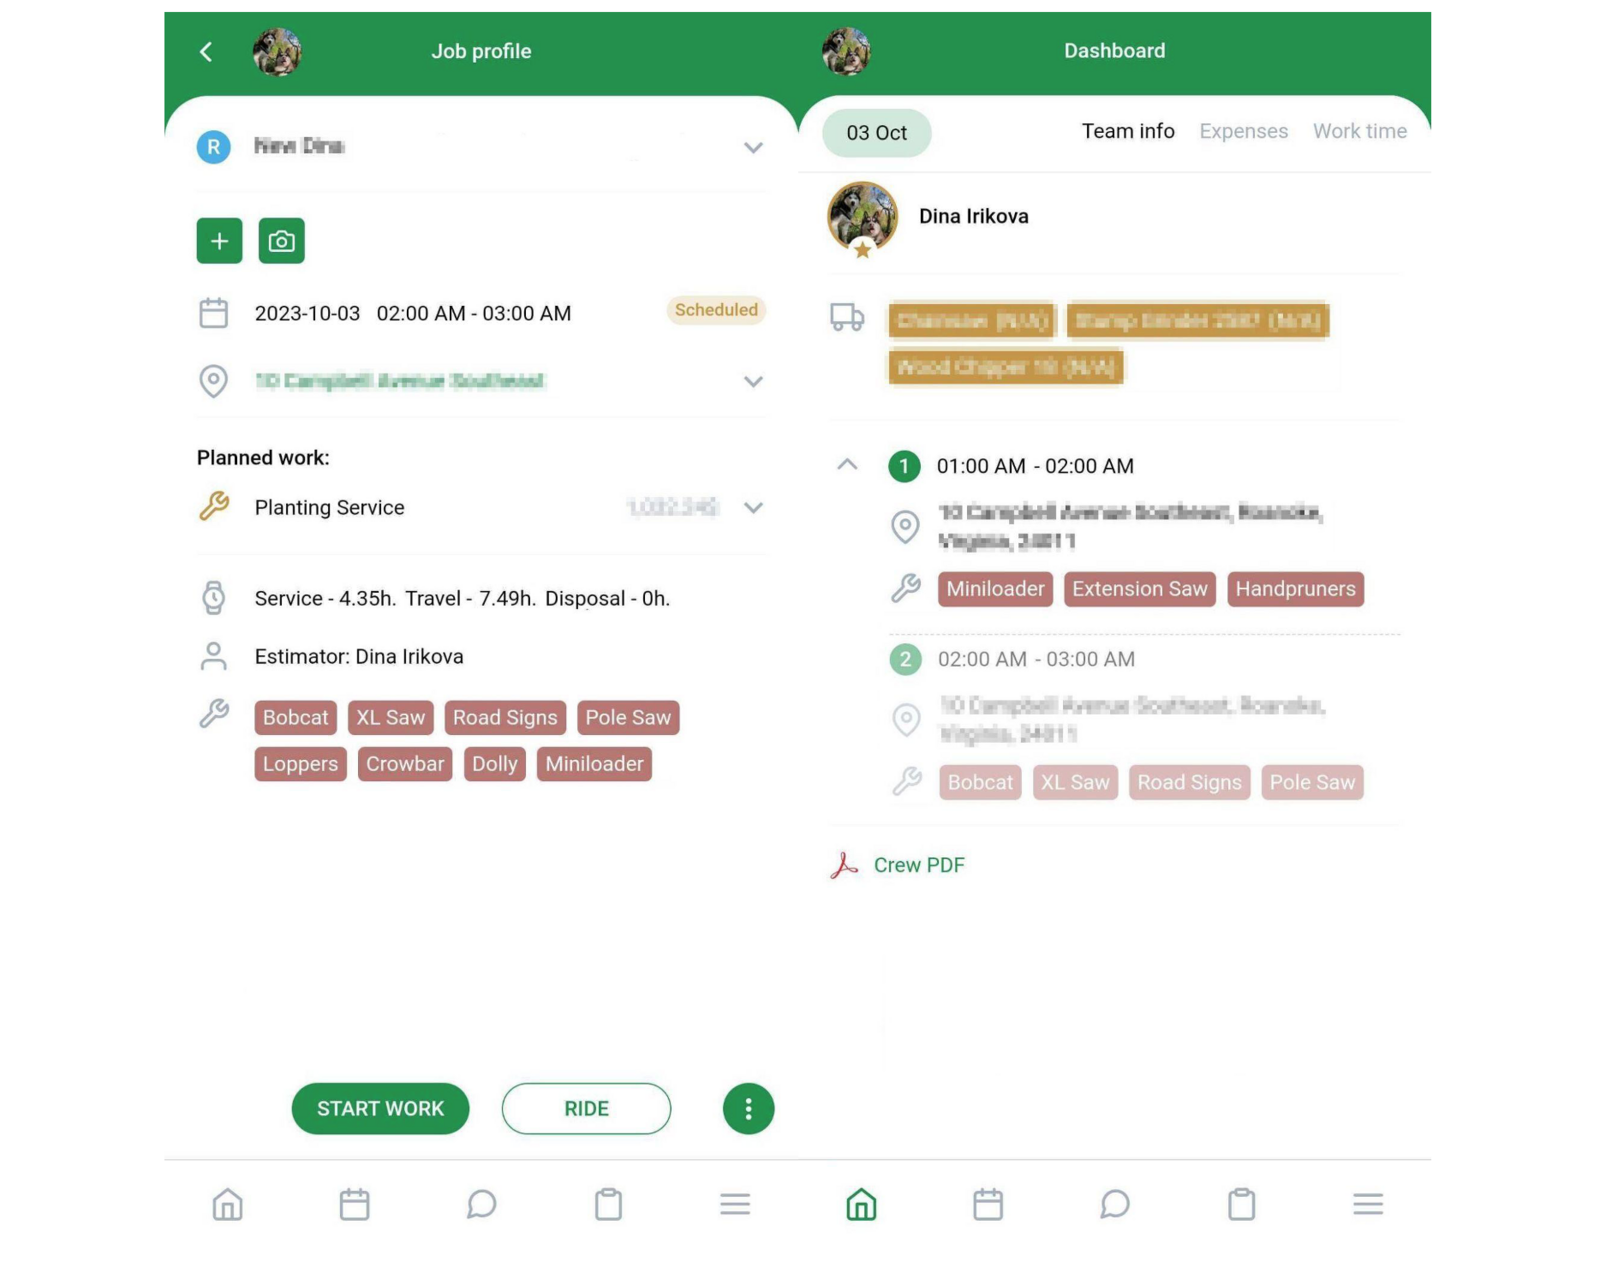
Office Schedule and task categories
All tasks in the office schedule are divided by estimators the same way job events are divided by crews. By pressing on select user you can filter the displayed users. It is possible to select one, a couple, and all users or to display only users with tasks. In that case, employees will vary from day to day. The calendar is clickable and you can choose the displayed day manually.
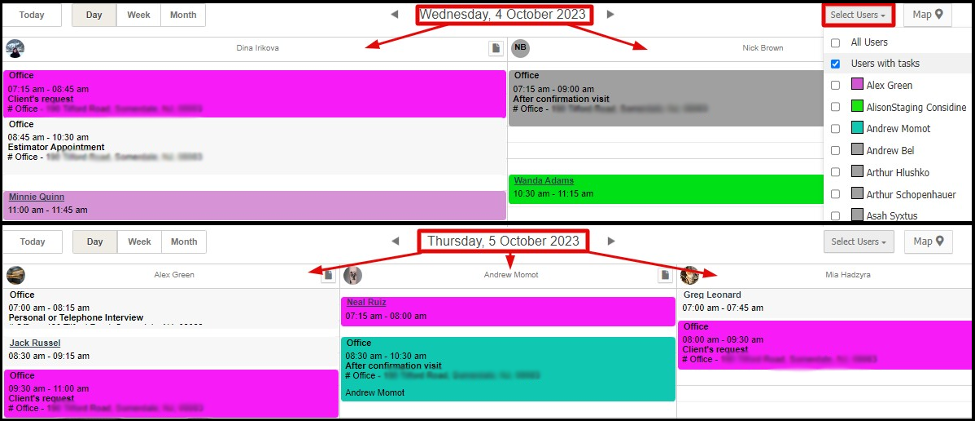
In the Tasks → Task Categories you are able to edit the existing type or create a new one. The task's dye can either correspond to the estimator's or the category's color. If the Task Sticker Color is set to User, the task's color will automatically change depending on the assignee.
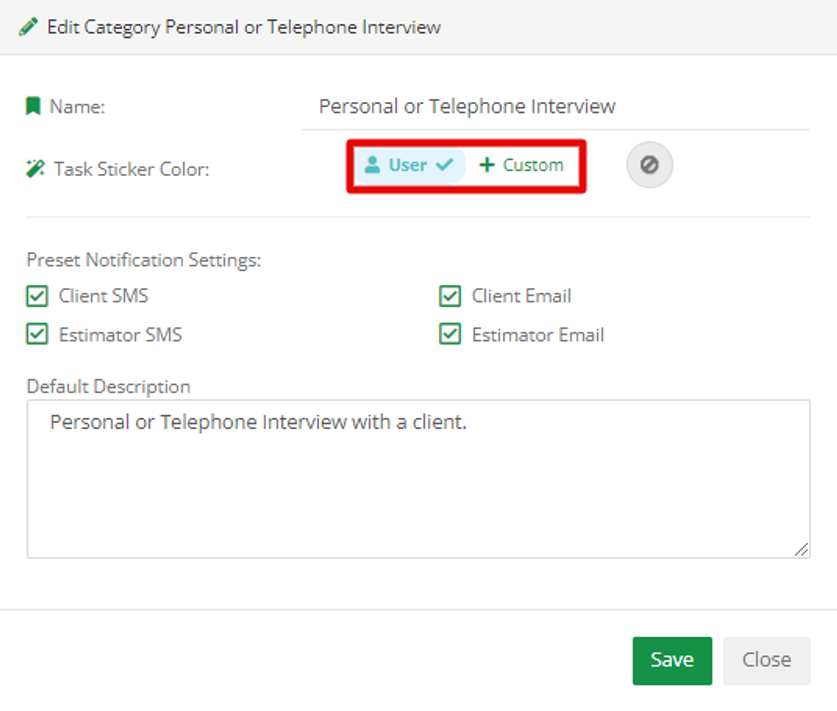
You always can change the assigned user simply by dragging and dropping the task between them. Please be advised the user's color can be set in User Management.

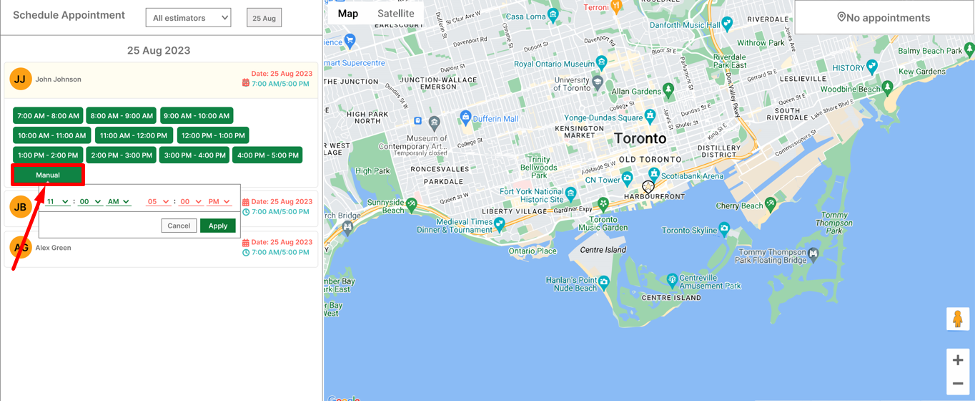
Manual time set for Appointment
The appointment slots can be set manually and the booking intervals are available for any length of the day.
Crew Schedule Job Statistics
On the Business Intelligence -> Schedule -> Crew Schedule Statistics page, you can see the list of jobs that have been booked and made their appearance in the Crew Schedule sub-module. The calendar is clickable and it’s possible to set the displayed time range manually. If you hover the mouse over the dates on the right side of the screen it will show you not only the job booking date but also the length of the appointment and the team leader.
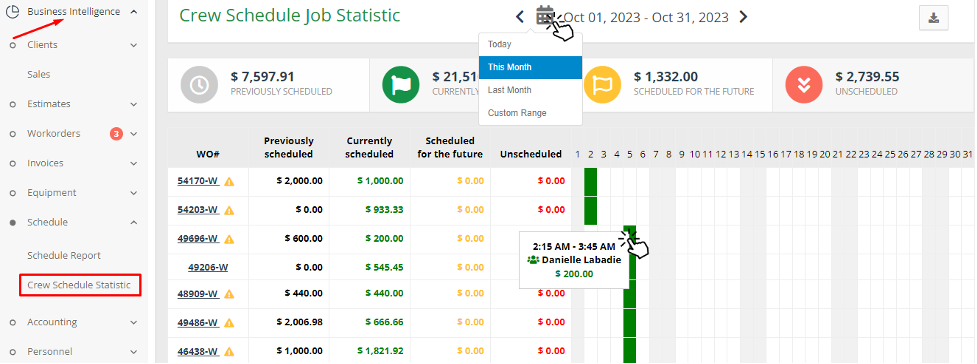
- Currently scheduled - shows the sum of already scheduled services.
- Scheduled for the future - shows the sum of services that are scheduled for the next time period.
- Unscheduled - shows the sum of the services that are present in the workorder but haven’t been scheduled yet.
- Previously scheduled - shows the sum of the finished services or the services that have been postponed if the workorder contains such.
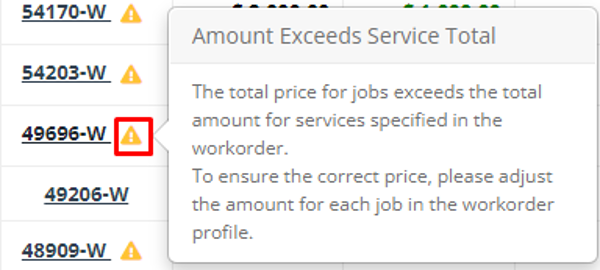
Please be advised that the exclamation mark next to the workorder number will appear automatically in case the total amount of jobs exceeds the total amount of services specified in the workorder. To ensure the correct price, please adjust the amount for each job in the workorder manually from the workorder page.
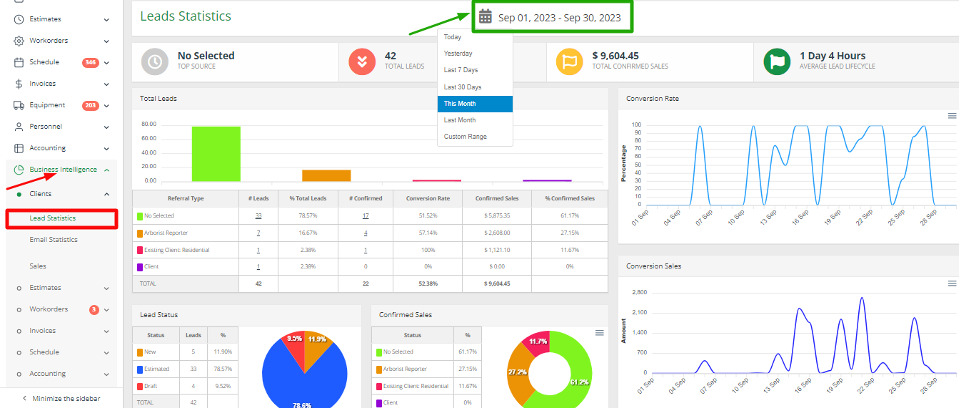
Leads Statistics
The Business Intelligence -> Clients -> Lead Statistics page shows all the relevant information such as the most popular source of reference for leads; the number of leads that were created for the selected time period; the average time which shows how long projects stay in the lead stage and the anticipated income from the created leads.
User Statistics
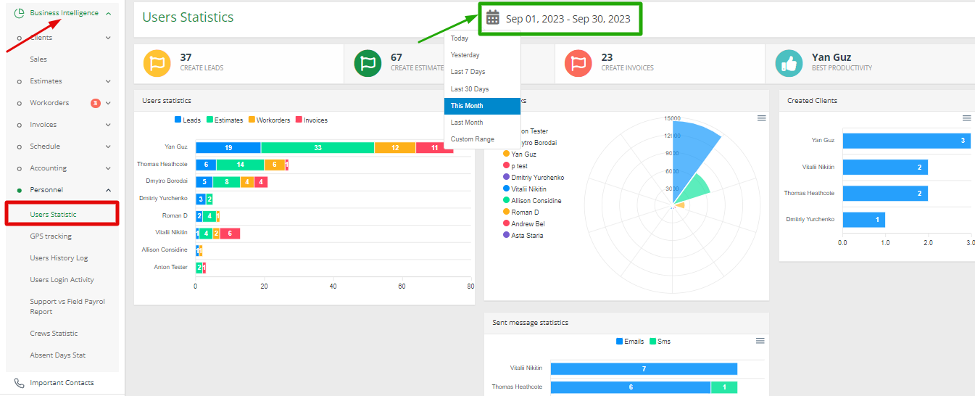
The Business Intelligence -> Personnel -> Users statistic page shows the activity of system users for the chosen period of time. It displays how many leads, estimates, and invoices were created by the user. It also calculates employees' productivity based on the sum of all the factors mentioned above.
