
When you open an estimate, Tree Inventory is available directly from the estimate page. You select the trees that need attention, assign services to each one, and add them to the estimate — all without leaving the screen. From that point on, trees follow the job automatically through the workorder, schedule, and invoice.
This article covers how trees work within the estimate workflow on the web — from adding trees to the estimate, through to PDFs and the Customer Portal.
Adding Trees to an Estimate
Trees are always added through the Tree Inventory Map — you can’t type a tree name or add one directly. The map is the only way in.
Opening the map from an estimate
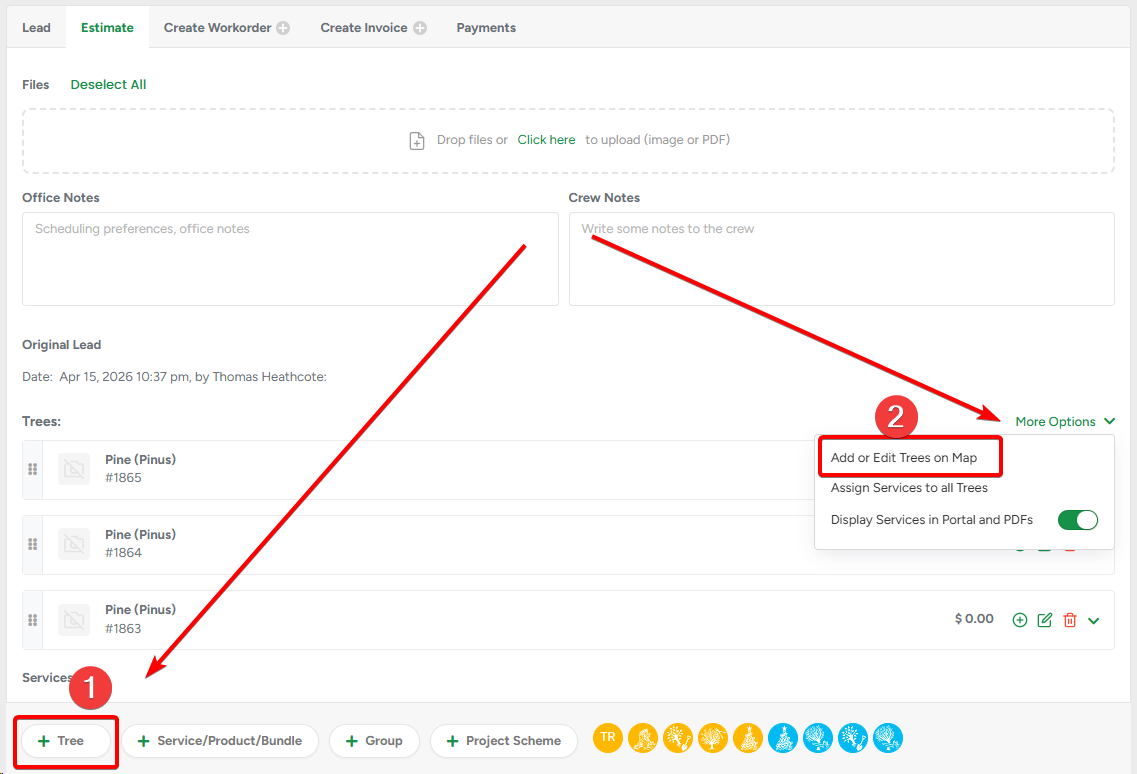
On the Create or Edit Estimate page, click + Trees or Add or Edit Trees on Map. The Tree Inventory Map opens in a modal window in the context of the current estimate.
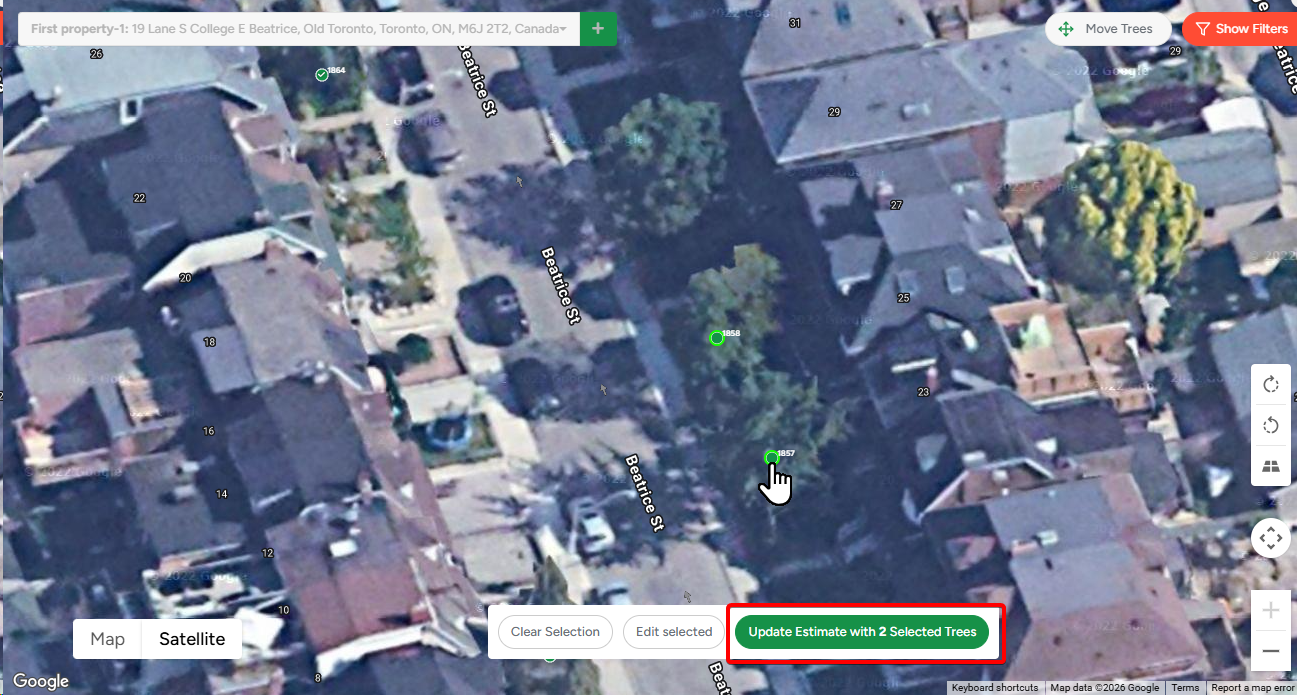
Select the trees you want to include. When you’re done, click Add to Estimate with [X] Selected Trees. You’ll be returned to the estimate with those trees added.
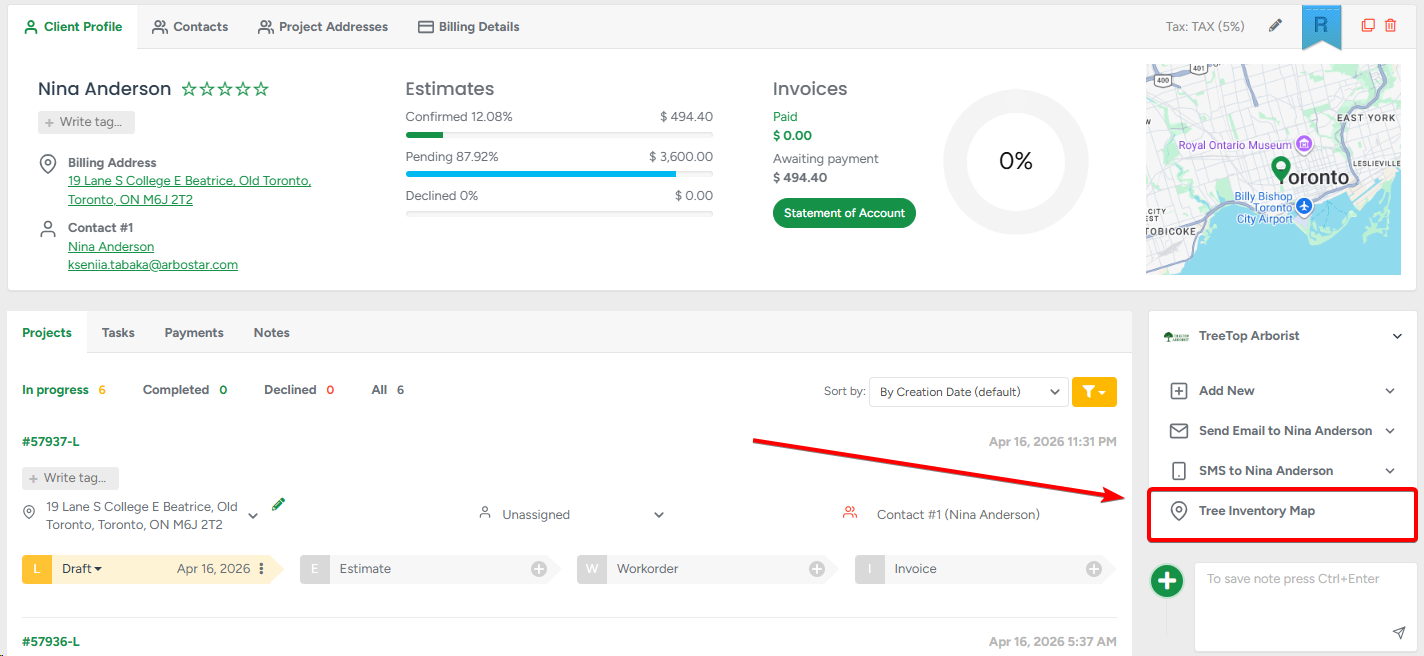
Opening the map from the Client Profile
You can also start from the other direction: open Tree Inventory from the client profile, select trees on the map, and click Create Estimate with [X] Selected Trees. You’ll be taken to the Create Estimate page with those trees pre-loaded.
Adding more trees to an existing estimate
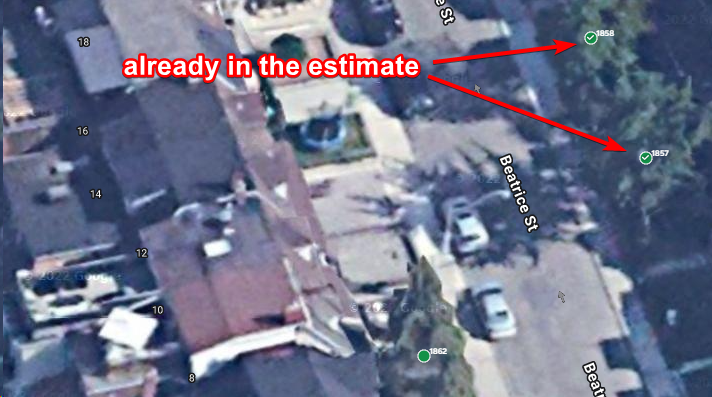
To add trees to an estimate that already has some, open the map again via + Trees or Add or Edit Trees on Map. Trees already in the estimate are marked with a checkmark. Select the trees you want to add (existing ones won’t be duplicated), then click Update Estimate with [X] Selected Trees. New trees are added; existing ones stay unchanged.
One map per estimate: Once you add the first tree, the estimate is locked to that tree’s map. All trees in one estimate must come from the same Tree Inventory Map.
Services on unselected trees: If some trees on the map have services assigned but aren’t selected, ArboStar will warn you before proceeding. You can click Add Selected Trees Only to include only your selection, or Add All Trees with Services to automatically include all trees that have services assigned.
Important: Services assigned to a tree on the map are only saved once that tree is added to an estimate. If you assign services to a tree but don’t add it to the estimate, the services won’t be saved.
The Trees Block
Once trees are added to an estimate, a Trees block appears on the estimate page, alongside the standard Services block. Both can exist at the same time — trees with their services, and standalone services not tied to any tree.
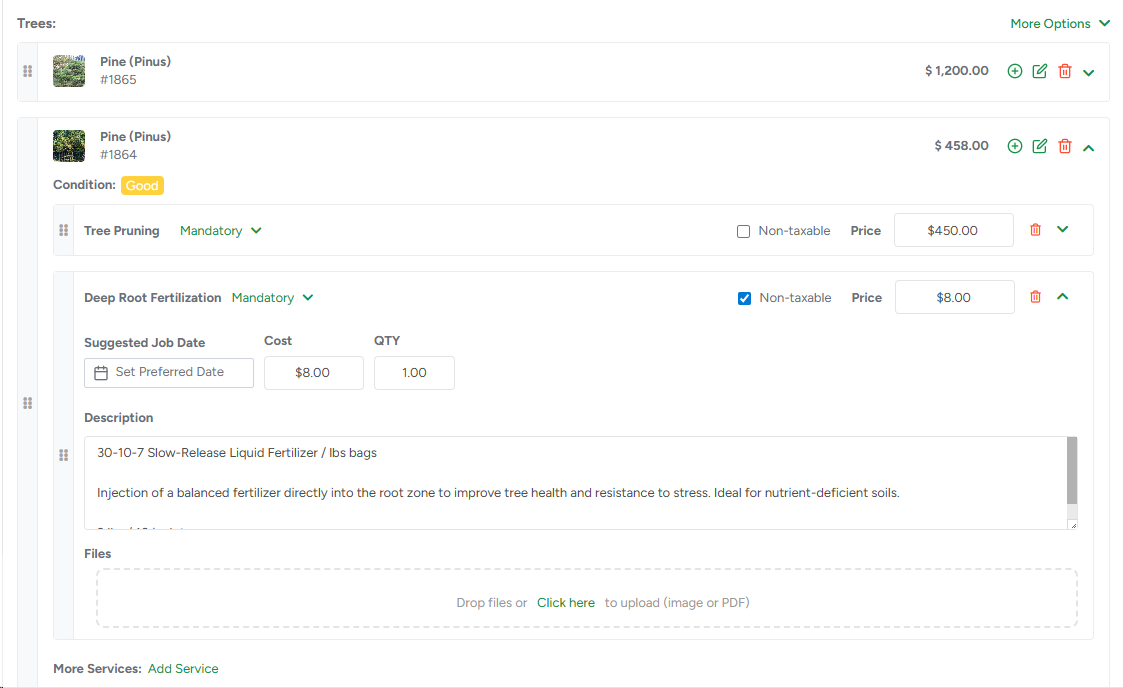
Each tree in the block displays:
- Tree # and all filled-in fields
- A list of services, products, and bundles assigned to that tree in this estimate
You can collapse or expand each tree card to show or hide its services.
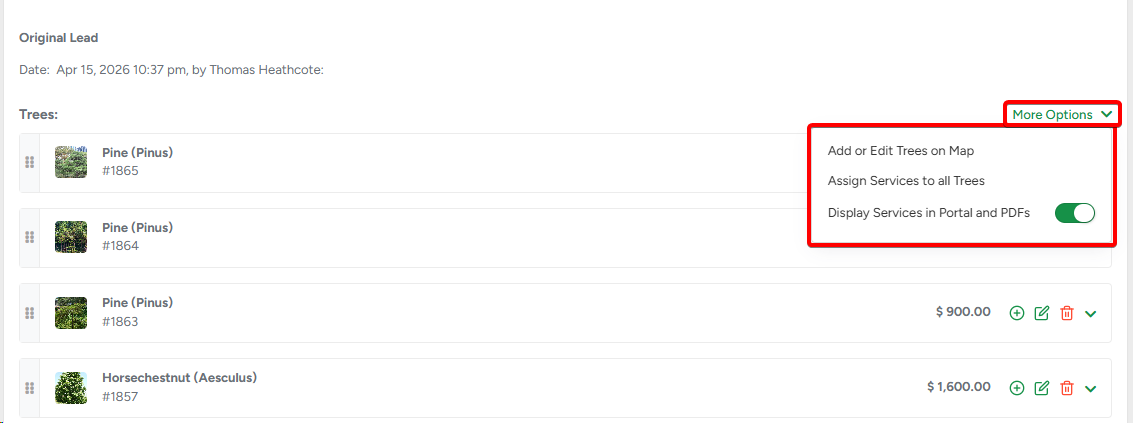
The Trees block has a More Options menu with three actions:
- Add or Edit Trees on Map — opens the Tree Inventory Map in the context of this estimate
- Assign Services to all Trees — opens the service picker and adds the selected service(s) to every tree in the estimate at once
- Display Services in Portal and PDFs — toggle that controls whether services assigned to trees are visible to clients on the Customer Portal and in PDFs
Assigning Services to Trees
Services, products, and bundles are assigned to individual trees — not to the estimate as a whole. Each tree in the estimate must have at least one service assigned before the estimate can be saved.
Adding a service to one tree
There are three ways to add a service to a specific tree:
- Click the + icon on the tree’s card. A service picker opens where you can select a service, product, or bundle. The service is added to the tree immediately and appears as a standard estimate service — you can edit the price, description, calculator, and other settings right away.
- Click the Edit icon (next to the + icon) to open the tree on the Tree Inventory Map. In the tree’s details window, scroll down to the Services block where you can assign services directly to the tree.
- Expand the tree card and click More Services: Add Service at the bottom of the tree card. This opens the same service picker.
Adding a service to all trees at once
Open the Trees block More Options → Assign Services to all Trees. The same service picker appears — whatever you select is added to every tree in the estimate. Existing services on individual trees are not affected.
Service options
Services, products, and bundles assigned to a tree work exactly the same way as standard services in an estimate — you can edit the price, use the calculator, change the mandatory/optional/recommended status, adjust tax settings, and so on.
Editing Trees in the Estimate
To edit a tree’s details (species, condition, notes, etc.), click the Edit icon (pencil) on the tree’s card. The tree details window opens. Changes you make to the tree’s fields are saved globally — they apply everywhere that tree appears, not just in this estimate.
Changes to services assigned to the tree (adding, removing, editing) only affect this estimate.
To remove a tree from the estimate, click the Delete icon (trash) on the tree’s card. Confirm the action. The tree is removed from this estimate only — it stays in Tree Inventory and can be added to other estimates. All services assigned to it in this estimate are also removed.
A tree cannot be deleted from the map while it’s in an estimate. To delete a tree, first remove it from all estimates that contain it.
Trees on the Estimate Profile
After saving an estimate, the Estimate Profile (read-only view) shows the same Trees block. For each tree you can see the tree’s details, the total cost (sum of all assigned services), and the list of services with their statuses.
Click View on Map to open the Tree Inventory Map showing only the trees in this estimate. Clicking a tree on the map opens a modal with its Details and History tabs.
You can also open a tree’s modal directly from the Trees block: click the navigation icon next to a tree in the list. This opens the same map with the modal for that specific tree already open.
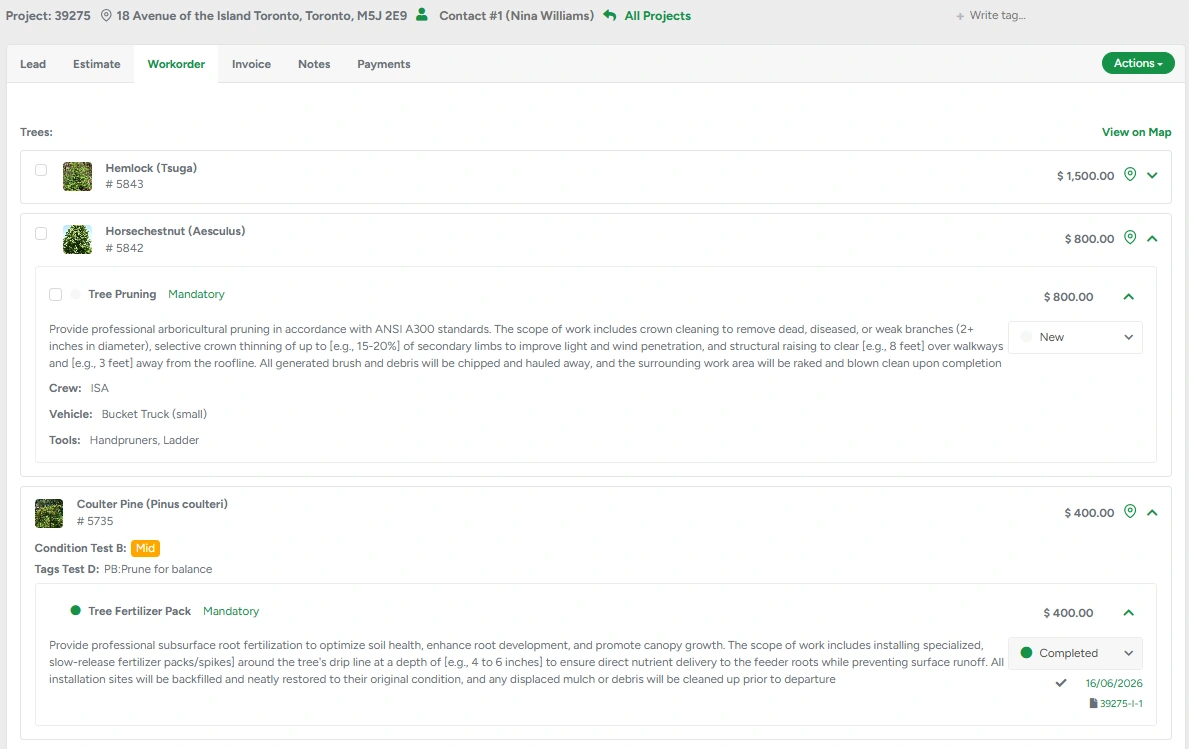
Trees in Workorders
When an estimate is confirmed, all trees and their assigned services carry over automatically to the Workorder. The Workorder shows the same Trees block structure.
In the Workorder, each tree and each service has a checkbox. Use these checkboxes when scheduling a job or creating an invoice — you can select an entire tree (which selects all its services), individual services within a tree, or any combination.
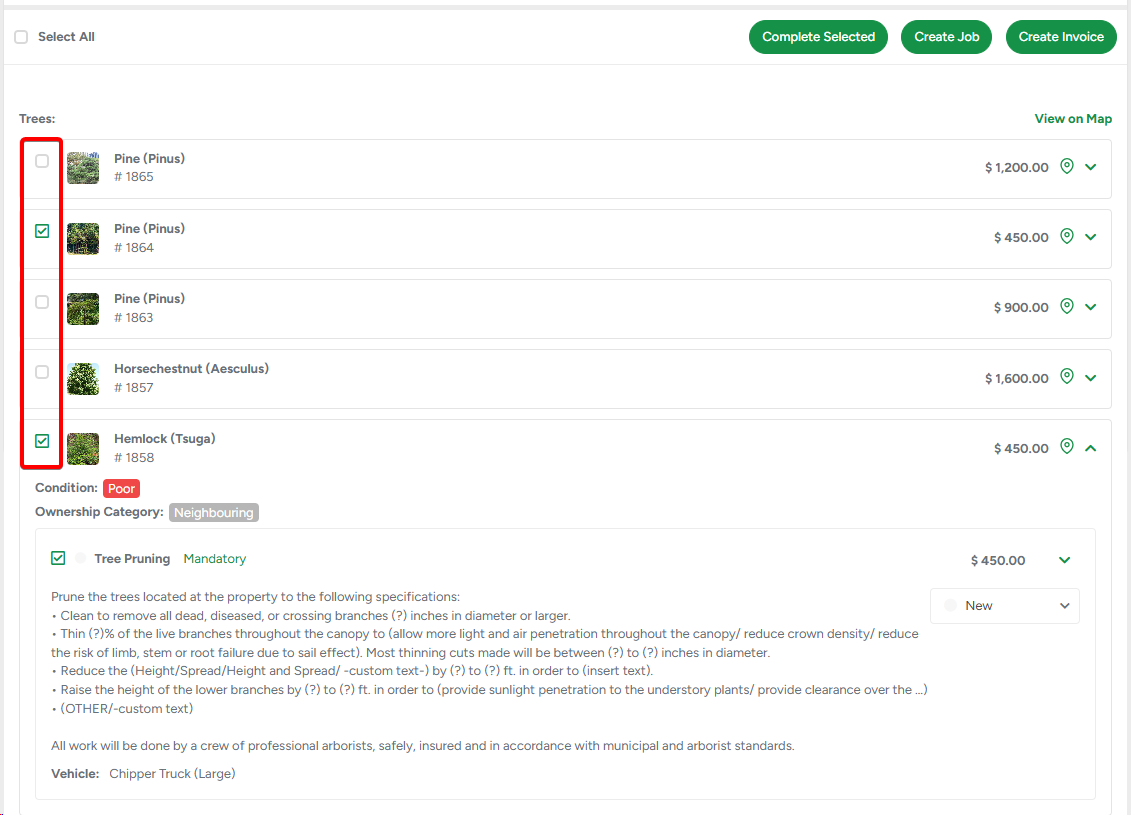
A Workorder cannot be created if any tree in the estimate has no services assigned. The system will block the action and prompt you to add services or remove the tree first.
Trees on the Crew Schedule
When scheduling a workorder, the Workorder Schedule modal shows all trees and their services alongside any standalone services. Use the checkboxes to select which trees and services to include in this particular job. Services not selected remain available for scheduling in future jobs.
On the Crew Schedule board, the job pop-up shows the trees and services included in that specific scheduled slot.

Trees in Invoices
The Invoice Profile mirrors the estimate structure. Trees appear with their services, and you can invoice them the same way as standard services — an entire tree at once, or individual services within a tree.
A View on Map button on the Invoice Profile opens the Tree Inventory Map, showing only the trees in that invoice. Clicking a tree on the map opens a modal with its details and the services included in this invoice.
You can also click the navigation icon next to any tree in the list to open the same map with that specific tree’s modal already open.
Trees on PDFs
When an estimate or workorder contains trees, they appear at the top of the services list on the PDF. Each tree is listed with the fields marked as Show to Client in Company Management, followed by its assigned services. Whether services are shown depends on the Display Services in Portal and PDFs toggle in the Trees block on the estimate. Services not assigned to any tree appear after the trees in the same list.
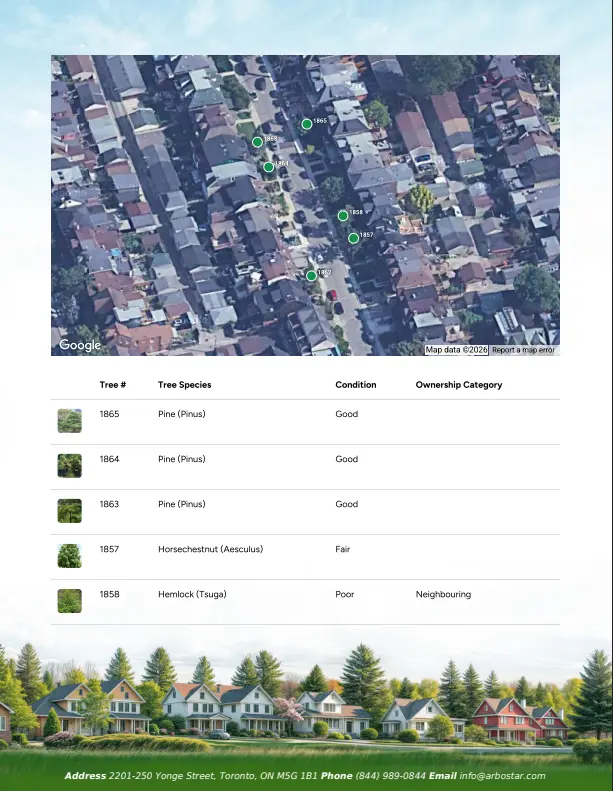
At the end of the PDF, there is a dedicated page with a map snapshot showing the positions of all trees, followed by a summary table with all tree data. The table columns correspond to the fields marked as Show to Client in Company Management.
 |
 |
Workorder PDF: Shows all tree fields marked as In Use in Company Management. The Show to Client restriction does not apply to the Workorder PDF — it’s an internal document.
Customer Portal
Clients viewing their estimate or invoice in the Customer Portal see trees listed at the top of the services list. Each tree displays the fields marked as Show to Client in Company Management, followed by its assigned services. Whether services are shown depends on the Display Services in Portal and PDFs toggle in the Trees block on the estimate.
Each tree has a View Tree on Map button. Clicking it opens an interactive map showing the positions of all trees.
Clicking a tree on the map opens a pop-up with that tree’s details - the same fields and services that are visible in the Portal list.
If the description of a service exceeds 100 characters, it will be collapsed.
Tree History
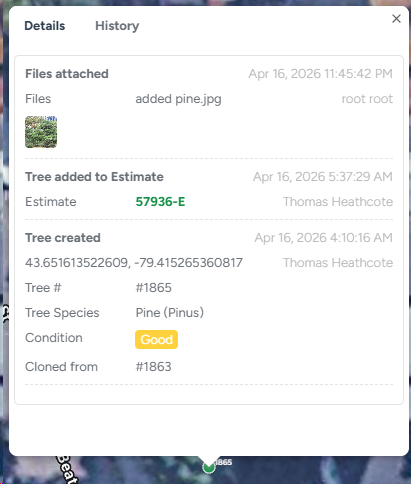
Every tree has a History tab that shows a complete log of everything that has ever happened with that tree — across all estimates, jobs, and invoices, not just the current one. History is global and spans the entire lifetime of the tree.
You can access Tree History in two ways: from the map (click any tree → History tab) or directly from within an estimate (open the map via View on Map → click a tree → History tab).
All events are shown in reverse chronological order — newest first. Each event shows who performed the action and when. History is read-only and cannot be edited.
History is organized into three categories:
Tree Changes — events related to the tree itself: when it was created, when any of its fields were changed, when it was moved on the map, and when files were added or removed. Estimates & Invoices — events related to the tree’s involvement in commercial documents: when the tree was added to an estimate, when a service was assigned to it, and when an invoice was created for its services. Estimate and invoice numbers are clickable and navigate directly to the relevant document. Jobs & Reports — events related to actual work performed: when a job was created for this tree’s services, when a service status changed, and when a field worker submitted a report for a service on this tree. |
|
Important: History only tracks active connections. If a tree is removed from an estimate, all history events related to that estimate are removed from the tree’s history as well.